Category Archives: Uncategorized

Civic Responsibility: Digital Citizenship

This summer, the International Society for Technology in Education (ISTE) has publicly announced a more focused initiative to promote digital citizenship (ISTE Blog, July 2018). Digital citizenship is not simply online safety practices.  Online safety includes maintaining good practices such as strong passwords, not becoming victims of phishing, spear fishing, or other social engineering digital attacks, and protecting one’s identity in online spaces. Digital citizenship is not simply about protecting yourself or your institution online. It is about creating a meaningful community, engaging in respectful debate, helping to shape public policy, and engaging in effective digital information literacy (ISTE Blog, July 2018).


Digital citizenship is meant to combat the tsunami of cyberbullying, trolling, toxic comments, online arguments, and fake news that we all see in our online environments.  Similar to being a good citizen in one’s physical community, one needs to be a good citizen within their virtual environments. As we move into this week where most of our undergraduate students will participate in their local community through Into the Streets, we need to remember and remind ourselves that citizenship is not limited to our physical geography.


What is perhaps most important to remember is that people who are not good digital citizens can (though certainly not always) actually be generally respectful people IRL (in real life).  The anonymity and physical distance provided by the online environment can provide temptations for individuals to engage in actions that they otherwise might not if they were able to be identified.  I explored this very issue over 10 years ago when I was in graduate school and today these same psychological principles continue to contribute to the sometimes toxic nature of the Internet world (see Christopherson, 2007).


So what might we do?  What are some of the ways that we in higher education can help ISTE meet their goals to encourage digital citizenships? Many of these strategies are actually easy for us to do as individuals:

  • When engaging in disagreements, do so with civility.  If the ‘other side’ continues to use toxic forms of disagreement, disengage so that you remove one of their platforms for incivility. Do not engage ‘trolls.’
  • If you notice someone being cyberbullied through comments or posts, post positive comments and encourage others to do so as well.  Doing nothing, does something. See StopBullying.com for other strategies to prevent and address cyberbullying
  • Be vigilant about fake news and spreading misinformation.  Stop and think before forwarding or sharing a post. Help others to identify these types of fake stories and images. See FactCheck.org for strategies to identify fake news and images.
  • Use digital mechanisms for engaging in social policy.  Engage in meaningful debate, post well researched solutions, share perspectives, use digital means to raise funds or awareness for meaningful causes.
  • Use digital materials ethically.  Appropriately give credit for multimedia you might use. Do not use someone else’s materials without permission.  Check for the permissions that are provided by the creator. Familiarize yourself with the copyright of information and materials you use (creative commons as an example).
  • Model digital citizenship through all online interactions and communications.


If the concept of fostering digital citizenship is of interest to you, I encourage you to explore ISTE’s site on Digital Citizenship.  Though ISTE is more focused on the K-12 educational environment, these basic principles and ideas can be translated into higher education.  This page provides a number of short articles on ways to incorporate digital citizenship into the classroom and how to create learning activities (such as problem-based learning and authentic learning tasks) that help students engage in digital citizenship.

Christopherson, K.M. (2007). The positive and negative implications of anonymity in Internet social interactions: “On the Internet, nobody knows you’re a dog.” Computers in Human  Behavior, 23(6), 3038-3056.

Moodle Assignment Feature: Feedback types and bulk grading features

Bear with me in this week’s blog post – I’m about to get a little ‘fan-girl’ crazy here with Moodle.  And for anyone who knew about these bulk grading and upload processes and never told me…Shame! Shame! Shame!


Last week I shared with you a way to help the first start of the grading processes for Moodle assignments go a bit quicker using the Download All Submission option.  At that time I also alluded to the fact that this can be the first step in helping later on with submitting assignments back to Moodle. Today I share with you the thing the literally made me want to jump and shout to the world what I think will be a LIFESAVER for those of us who do a lot of electronic grading.

Excited Cat Meme

Image from https://imgflip.com/i/1dqrhu


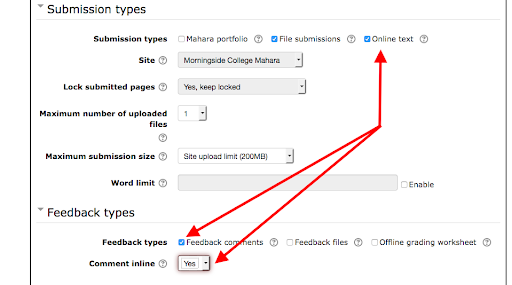
But before I get into the really exciting part, let me share with you a few of the features in Moodle that you can use to provide different types of feedback to your students.  When you create or edit an assignment you can select the different ways of providing feedback: Feedback Comments, Feedback Files, Offline Grading sheet, and Comment inline.


Feedback Comments, when enabled, will include a textbox for you to write comments back to your students.  Feedback Files, when enabled, will provide you a place to upload a file – most likely a Word file that you have made electronic comments on.  If you have provided a textbox for your students to type their assignments into (you do this in the Submission Types –>Online Text) and enable the Comment Inline feature, you will see your student’s responses from their online text submission in your feedback comments textbox and you can comment within the student’s text (see below for what I mean by this).


The settings:


How it works:

View Video Click Here: https://use.vg/W4gzdm


But probably what I am most excited about is the fact that I just recently started to explore just what this Offline Grading Sheet was all about and WOW have I been missing the boat there.


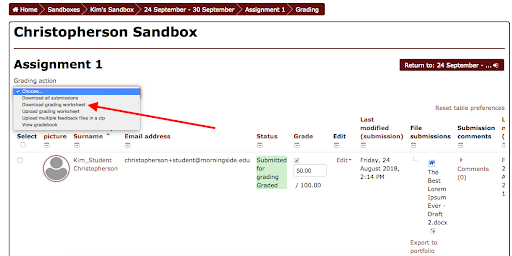
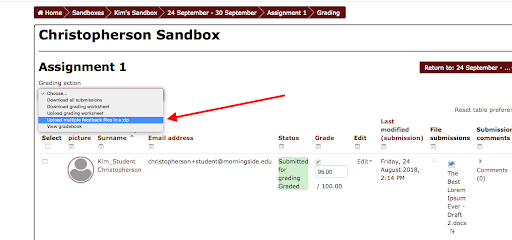
When you enable the offline grading sheet, you will then be given an option in the drop-down menu where you can also ‘download all submissions’ to download the grading sheet.


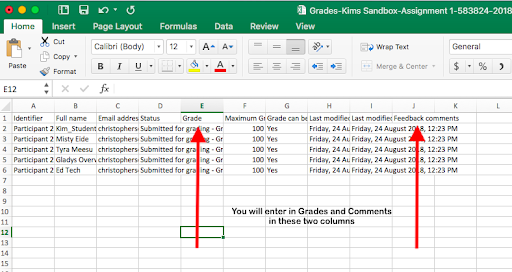
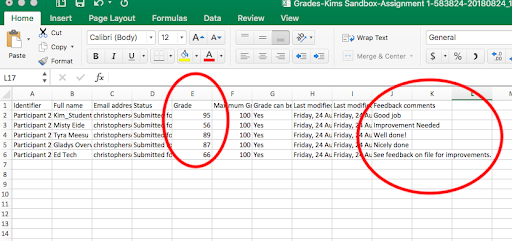
Doing this will download an Excel file to your computer that is formatted so that all you need to do is enter in the points grades for students on the single excel sheet.  You can also write in your feedback comments on this grading sheet as well.


Once all of the grades are entered, then you can simply upload this sheet back (don’t change anything about the formatting except for the grades and the feedback you entered) and Moodle magic updates all of the grades for you at once!  You can do similar quick grading on the initial page of an assignment in Moodle, but this allows you to also do this while not connected to the Internet (at least until you have to upload the sheet). Here’s a quick demo of how this works:


View Video Click Here: https://use.vg/4GnnyW


So, once I learned about that I decided to explore the other options in that drop-down menu that I typically ignore (we truly just don’t always have the time to explore this stuff right…plus we don’t want to break the Moodle).  So I explored what the “upload multiple feedback files in a zip” was.


Well, surprisingly it’s exactly what it sounds like.  A way to upload all of those commented worksheets or papers at once (rather than going student by student).  The trick here is that you need to first download all of the files using the “download all submissions” tool.  This names the files in the way that is necessary to batch upload again. After that all you need to do is to save all of these files into a zip folder and then upload it back and BOOM! All the files are there.  What might take you the better part of an hour to do when turning back assignments (especially if you have have 30-40 or more students in a course) is now done in the matter of a few minutes! Now if we can just get the actual grading to go quicker right?! See this magic at work here:


View Video Click Here: https://use.vg/g0pIJm


So are you as excited as I am about this? This will literally save me hours of time as I grade assignments this year.  The one thing to be aware of is that students do not receive an automatic email notifying them of these updated grades and files.  But this is easily done by simply clicking the “save all grading changes” at the bottom of the quick grade view.


**Edit to add information**

Unfortunately if you use ‘Rubrics’ or ‘Marking Guides’ as your grading type in Moodle the Offline Grading Sheet feature is not available.  However, you can still do a bulk upload of all feedback files.

Moodle Assignment Feature: Download All Assignments

When Susie and I had the faculty respond to a short survey, there was a lot of interest from you on learning more about the different features of two particular Moodle activities: Assignments and Quizzes.  These are probably two of the most commonly used Moodle activities (Forums are also very common) at Morningside and there is probably more to them that you are aware.

Even I have learned a few new strategies for using these tools recently and this year one of my goals is to share these with all of you.  This Fall I focus on Moodle Assignments.

Basics:

The Moodle Assignment is basically the drop-box feature in our learning management system (LMS).  Instructors provide instructions and materials for students to complete and then students submit their work electronically through Moodle.  Instructors then provide feedback and grade the assignments, turning them back electronically through Moodle. Here is a document outlining this basic process.


Assignment Options:

There are many different options available that you’ve likely noticed if you have ever included one of these in your course.  For example, there are different feedback types, different grading mechanisms, you can use something called ‘groups,’ you can enable multiple attempts, you can use a ‘quickgrade’ or you can grade students one screen at a time.  I’ll discuss using some of these different features in future blog posts, however, In this installment I want to give you one tip that might help the grading process go just a tad bit faster – the Download All Submissions feature.


Using Download All Submissions:

After your students have all uploaded their assignments to Moodle there are really two ways to download the files onto your computer so that you can provide feedback on their assignments.  1) you can click on each individual student file and download them individually or 2) you can download all files as a batch. There are a few benefits to using process #2: First, there is WAY fewer clicks and less waiting for downloads and second, using the download all submissions option automatically names the files with the students names.  So you don’t need to depend on students properly naming their files for you to identify them on your computer! Here is a short 30 sec video demonstrating how to do this.


https://use.vg/xYu57R


The one drawback that I can think of is this.  You really need to wait until after the due date to use this bulk download process in the most efficient manner, so if you are someone who likes to grade as assignments come in, this process might not be the best to use.  This bulk download does not recognize if you have downloaded the same file previously. It’s still possible to use it, there is just more file management that needs to occur on the instructor’s end (i.e. moving new files into your assignment files and ignoring student files that you have already saved).

This process can help speed up grading by basically reducing the time it takes to download each individual student’s file to your computer.  Additionally, using this process also makes it possible to do a type of bulk upload (to be discussed in a future blog post! – This is a feature I just learned about myself).

Universal Design (UD) and Benefits for All Students

The term Universal Design initially originated in the field of architechture design as a way to describe creating building designs that incorporated features that helped accommodate those with disabiities and also were useful to those without disabilities.  Consider how helpful having automatic doors are when your hands are full or how nice it is to have slopped sidewalks at corners if you are pushing a stroller.  These are all benefits of UD.  The same idea can be applied to the classroom when we begin to make accommodations that are often availble to student with disabilities to all students in the classroom.  Creating videos with closed captioning, having electronic textbooks that have an e-reader feature can be very helpful if one needs to view a video where having the sound on might not be appropriate or if they need to read a chapter while driving to and from school.

Technology has allowed for more incorporation of UD into the classroom.  Below I present a table of just a few common classroom issues that might benefit from a UD approach.  I present a low-tech, medium-tech, and high-tech approach.

Educational issue Low Tech Mid Tech High Tech
Addressing test anxiety Allow for multiple attempts on an exam/quiz.  Turn in test, get feedback, schedule time to re-take test one more time Allow for multiple attempts on a exam/quiz, but use scantron technology to facilitate grading. Schedule time to re-take exam Using LMS create an exam that allows multiple attempts as the exam is being taken during class.  No need to schedule another time.
Reading Disabilities Have a text be read aloud to students in a disabilities support center. Provide an e-book with a text reader capability for students with documented disability Provide all students the choice of textbook modality they prefer including either physical or e-book with read aloud feature.
Students unable to attend class regularly due to some legitimate reason. Students encouraged not to enroll in the course due to absences Instructor provides some lecture notes and e-mails assignments to student All course material is provided on the course LMS including lecture notes, videos, assignments, feedback, etc.


Using Technology in Lesson Design

One manner that we can utilize technology as instructors is through our lesson planning process.  There are several processes for designing lessons, but perhaps the most powerful is the Backward Planning approach that is recommended by most instructional designers.  This approach asks the teacher to first consider what you want your students to DO before you consider what you will teach.  With Backward design we start with the student learning outcomes first (written with verbs that indicate some action on the part of the student that is measurable), then decide on the manner in which we can measure learning (assessment instrument), and then we decide on the materials and activities that need to be done to practice and develop these skills.


Here is an example of how technology can play a role:

Perhaps you are a history teacher and want students to understand the relationships between current economic conditions and political policies that were developed.  First you will want to decide how your students could demonstrate this understanding.  Perhaps you will have them engage in a debate between two rival political parties one the historical policy. Your assessment might be a scoring rubric with a number of necessary elements (facts, relationships between economics and policy, explanation of party differences, etc).

Now that you know what your students will do and how they will be evaluated, now you can decide on the information they need to know and the activities they can do leading up to this.  So then you might ask, how does technology play a role?

Perhaps you do not have class time to have a live debate? What are some alternatives?

  • Students record in small groups their debates
  • Have a social media debate
  • Have students create a documentary portraying the debate

How does technology play a role in assessment?

  • recorded evaluation allows instructors to rewind and view elements again.
  • Recorded products can be shared internally or globally
  • Rubrics can be created electronically

How does technology play a role in materials and activities?

  • textbooks and original historical documents available on the internet
  • Other research from historians.
  • Online or electronic activities, quizzes, etc.


Technology is not necessarily a requirement for this project, it could be done without it.  But you can see that integrating technology provides opportunities for your students that are otherwise difficult to do without it.  The important part here is really process.  If we know where are students need to be at the end, we can better tailor our lessons so that students can meet those expectations.

Multiple Submissions/Drafts Moodle Tool

Did you know that Moodle offers a way for students to make multiple attempts on an assignment activity? One of the options within the Assignments settings allows instructors to better identify and organize multiple attempts on a single assignment.  There are a couple reasons why an instructor might choose to do this.  If you have an assignment where you allow students to resubmit until they hit a certain criteria, this option allows you to do this.  Another reason an instructor might use this feature is to organize multiple paper drafts.  In this week’s blog post I have linked a video that I made that steps instructors through allowing multiple attempts on an assignment.  The video is somewhat specific to how you might choose to handle multiple paper drafts, but this tool can be used in other ways as well.

The solution I offer here attempts to address the organizational mess that handling multiple paper drafts for multiple students can be.  Please see this 16 min video and if you are interested in incorporating this next semester, I am happy to help you get the assignment set up to do what you want.

https://youtu.be/eTdnb7-orB4

Reports from the 2016 Quality Matters Conference

About a month ago I attended the 8th Annual Quality Matters Conference in Portland, OR. This conference offers a number of opportunities for faculty, staff, and administration people involved in online and blended learning to learn more about the Quality Matters rubrics and how to use them to help improve course design.

I attended a couple of half-day pre-conference workshops and a number of conference sessions on topic ranging from methods for implementing the QM rubrics on campus to strategies for making specific types of course improvements.  I learned quite a bit but I came away from the conference with three major take-aways:

  1. Morningside’s online programs are in good position to begin utilizing the Quality Matters rubrics in both course design and in creating quality assurance processes.
  2. Morningside faculty are perhaps unusually willing to explore the potential uses of the Quality Matters rubrics. Many people I spoke to expressed difficulty in having engaged faculty in the process.  Morningside’s faculty seem very willing to engage in this process.
  3. A clear plan needs to be envisioned to assess the impact of implementing the QM rubrics here. Notably, meaningful metrics need to be identified and measured.

So what is on the horizon with Quality Matters and Morningside College? I am currently in conversations with the leadership in the three online programs at Morningside (Grad Ed, Grad Nursing, and Organizational Management) to create implementation plans that makes sense for each of those online programs.  A primary focus of these plans will be on faculty development and use of the rubrics for course development/design and peer-review of courses.

If faculty are interested in how they might use the Quality Matter’s rubrics in their own courses (online or FtF) please feel free to contact me and have a conversation about how this might be a useful resource for you.  Or you can listen to a recent Ed Tech development session where a few of the undergraduate faculty who piloted using the rubrics in their summer online courses found using these rubrics.

Sway: Creating Visually Interesting and Interactive Projects

This week I want to introduce Microsoft Sway.  Sway is a program designed to help users create projects that are visually interesting and incorporates some interactive components.  It is a little difficult to describe what Sway is, so instead here is an example that I created.  This is a short project describing one of my hobbies, canning fresh foods.

Sway provides the user with a number of existing templates to choose from (for example I searched for ‘communication’ and Sway had a template ready for me with ideas of what to include) or to create their own. The basic building block is called a ‘card.’ These cards can be text or media based. Additionally there are different options for grouping cards together.  Another nice feature of Sway is the ease in finding media.  Sway holds a library of images and videos that are part of the Creative Commons License, so you can be confident that you are allowed to use the images you search for.  All of the images in my Sway example came from their library.  All I had to do was use a search terms (e.g. “tomatoes,” “chopping food,” “canning tools”) and a number of options were presented.

Bringing images in is done through a simple drag-and-drop action. In addition the user can include information about the image and include alt text (text that screen readers can read) for those who are visually impaired.

A few ways that instructors might choose to use Sway can include giving students a slightly different way of presenting material.  This tool allows for a story telling approach that PowerPoint may not do well.  Student may also use this tool to create electronic projects.  Stories, Informational Projects, Marketing materials, Research Presentations are just a few ideas.

If you are interested in seeing a Sway build in action take a look at this short 4 min video I made.

MyHistro: Interactive Timeline Builder

Ever wanted combine a series of historical events with images, video, description, and map locations? MyHistro is a free timeline builder that allows users to do this quite easily. Entire stories can be captured using this tool putting historical events into context in terms of both time and location.  There are a number of examples that can be viewed here.  To learn more about each event, click to read more and see more pictures and videos.

Creating a timeline is pretty easy.  First you need to set up a free account, but from there you can build your own stories (projects).  Here is an example that I created telling the story of all the places that I have lived. It took about a half hour to build this timeline.

Creating the timeline is pretty easy. All you do is identify the events you want to describe and provide the dates and descriptions.  Images can be uploaded (though I am having difficulty with this right now, it may be something to do with my OS upgrade to Sierra), but extended descriptions and videos from the web are easily added as well.

There is an ability to create collaborative projects as well so students can work together on a larger timeline project.

Overall this appears to be a nice, easy tool to help students engage with the material more both while learning from the timeline and in creating their own timelines. I’d be interested in hearing about different project ideas that faculty might have that this tool could make possible.

Introducing Lightboard

When creating content for digital delivery (i.e. the Interwebs), it sometimes seems as if we start to lose that important element of the instructor’s presence.  Creating a lecture using screen capture or PowerPoint narration just isn’t the same as being in from of your student so they can see you face, your hands, and hear your voice.  Of course you can just record yourself in front of a white board but then you are turning your back to the camera.  A solution? Something called a Lightboard.  This is a board that allows instructors to face their audience (the camera) and write at the same time.

Lightboards can be built in many ways, but essentially they all include the same parts.  A plexiglass board, a black background, lighting, a mirror, and a camera.  At Morningside we have created our own lightboard thanks to the persistence of Jessica Tinklenberg and the handiness of Jeremy Schneider.

Here is a quick demonstration of the lightboard that was shown in a faculty meeting recently:

Making lightboard videos is very simple, simply prepare your lecture, show up to the studio (currently on the second floor of the library), set the lights (about your height), and turn on the camera.  Any miss-steps, errors, time spent erasing, etc. can be easily edited out post-production.

For me I plan to use this extensively in the development of a potential hybrid stats class in the future.  In the past I used a program that recorded on a virtual whiteboard, but I want my videos for this class to be a bit more personal then my disembodied voice narrating a set of equations. Anyone who does create content using out lightboard we would love for you to share with the community so that we can see how you use it.  Please tweet your video to @MsideEdTech so that we can all see the cool stuff Morningsiders can make!