The COI Framework – Cognitive Presence

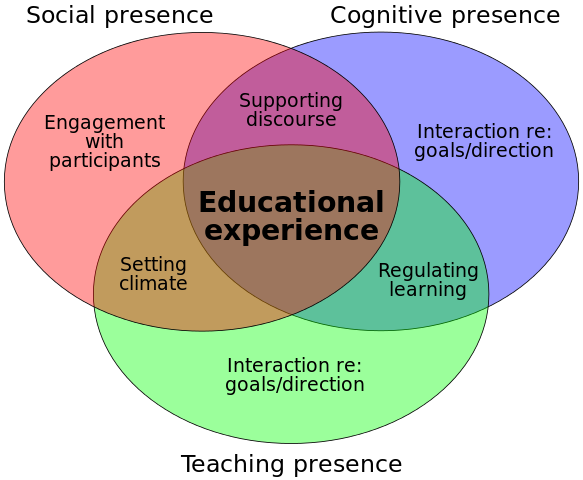
The Community of Inquiry Framework provides an overall structure for understanding how different forms of ‘presence’ can interact and influence the student experience and student learning.  In this blog post I’ll focus on the notion of Cognitive Presence and how this impacts learning and experience.  

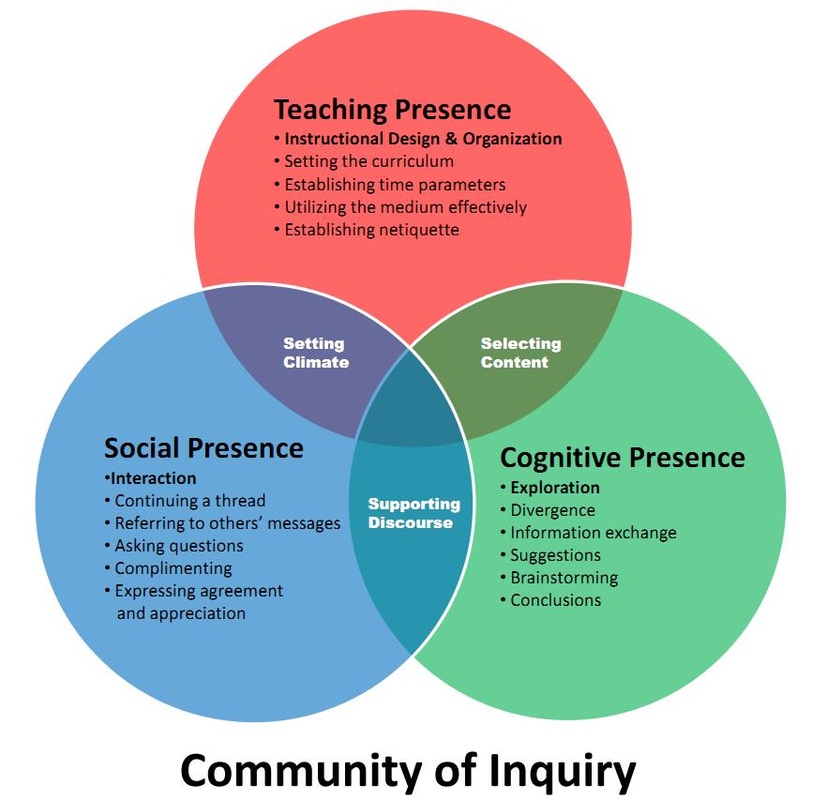
Cognitive presence is defined as “the extent to which learners are able to construct and confirm meaning through sustained reflection and discourse in a critical community of inquiry” (Garrison et al., 2001). When we think about our own teaching, we are generally first concerned with this form of presence.  What do we want our students to learn and how do we want them to learn it? 

However, unlike a more general ‘sit and git’ approach where an instructor provides readings and/or lectures on the material and students later on demonstrate their understanding through exams or academic writing, cognitive presence is about the process of creating meaning and providing the right types of activities and experiences to promote this process. 

Garrison (2017) describes four phases that should be used to help cultivate cognitive presence in the classroom.  These phases include:

  1. A triggering event: A problem or dilemma is introduced, preferably one that will engage student interest.
  2. Exploration: Students work to understand the nature of the problem.
  3. Integration: Order is imposed on the information gathered in the exploration phase. 
  4. Resolution: A solution is decided upon based on the work done in the integration phase. 

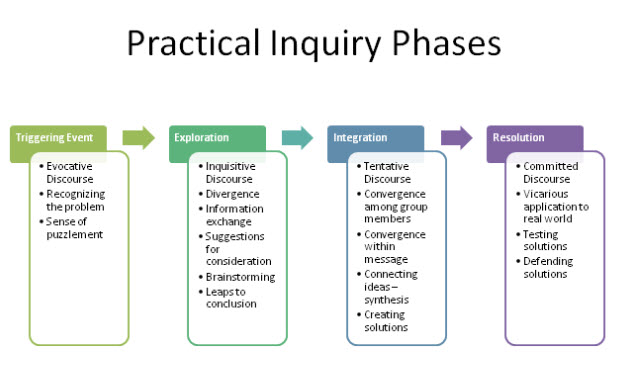
Garrison warns that it is easy for students to stagnate or get stuck in the exploration or integration phases.  He suggests that instructors may need to push students toward the resolution phase to complete this process.

Many of you will recognize these as most of the steps present in the process of critical thinking and this is no accident.  Cognitive presence is the process of having students engage in critical thinking.  To wrestle with the content, concepts, theories, principles, or ideas of the discipline and to make sense and make use of that information.  

Sounds great right! But how do instructors facilitate such a complex process in an environment where most interaction is done online and asynchronously and often with some serious time limits (many online courses are only 8 weeks long!)?

Some of the recommendations given by Garrison (2017) are as follows:

  • Utilize Problem or Project Based Learning strategies within the course.
  • Don’t overwhelm students with content and assignments.  Target content and activities such that they provide the right background, direction, and structure for students to free up more time for the thinking process.
  • Provide time for reflection. Garrison (2017) discusses the notion of shared metacognition which requires students to monitor and manage their understanding and assist in the understanding for others.
  • Use smaller groups for online discussions. This allows for a more manageable amount of information and work and for students to connect with a targeted number of people in the class.
    • Within discussion boards use the following strategies:
      • Provide stimulating questions
      • Identify puzzling issues that arise in the discussions and ask students to focus on those.
      • Challenge ideas that students pose. Have them dig deeper into their through process.
      • Have students test their ideas through application.  Use a “if you believe this/then this is what is looks like in practice” approach
  • Provide opportunities to model and reflect on the process of inquiry.

For more ideas visit this site which provides yet more ideas for activities that help students engage in this form of inquiry/critical thinking.

To summarize, cognitive presence is really characterized by assisting students to engage in the process of active inquiry and critical thinking.  Sometimes this work can be done individually and other times this is done in collaboration with other students in the class and/or with the instructor.  

References:

Garrison, D.R. (2017). E-learning in the 21st century: A community of inquiry framework for research and practice. 3rd edition. Routledge: New York.

Garrison, D. R., Anderson, T., & Archer, W. (2001). Critical thinking, cognitive presence, and computer conferencing in distance education. American Journal of Distance Education, 15(1), 7-23

The Role of Community in Online Learning

Since March 2020, schools have been thrust into the realm of digital learning. This form of learning comes with many different names, each attempting to address a nuance of the experience. Computer mediated communication, online teaching, online learning, remote teaching, digital teaching and learning, mobile learning. The common denominator for each of these is that teaching and learning take place primarily through some form of digital delivery. Sometimes the teaching is synchronous and other times it is asynchronous. What is pretty clear is that most of us were (and probably still are) uncomfortable (both teachers and students) with being forced into these modalities. We wondered how we could best get our content across? How could we test students without them simply cheating? How could we know when someone was falling behind or not understanding the material? How did we know if someone was just being lazy or if they were ill or otherwise distracted away from class? How would we get to know our students!?

These concerns are not new to pandemic teaching. These same concerns have been expressed even in the days of correspondence learning. In fact online learning has often been viewed as ‘less than’ because of concerns of student cheating, perceptions of rigor, and what is seen as a recipe for a lack of instructor-student connections.

One of the big focuses of creating effective digital learning environments is the idea of creating a Community of Inquiry. A theoretical framework first presented by Garrison, Anderson, and Archer in 2000, they proposed a model for creating an environment to enhance learning for text-based computer mediated communication (a term used often in the early 2000s to describe online communications). Their model proposed that for a digital learning environment to be successful, three forms of ‘presences’ needed to be cultivated: Cognitive presence, social presence, and teacher presence. As we have learned in the past 20 years since this framework was proposed, we do not need to just limit this to text-based digital environments.

This semester I will be using the Ed Tech Blog to dig deeper into this Community of Inquiry (CoI) framework that is used almost universally by professional development in online teaching and design. I will discuss each of these three presences in detail and provide tips and tricks for how to incorporate these into your course design and instruction.

20 years of research has supported the utility and effectiveness of this framework within digital teaching and learning. To get more overview of this framework, I invite you to explore the CoI website and their publications. Additionally, you can interact with this Thinglink page to listen to and read more about each of the three presences and their interacting roles within this framework.

Using PDF markup in New Moodle for Grading Assignments

Moodle has had the option of providing markup capabilities for PDFs for quite a while.  In our previous version of Moodle, I often suggested that people not bother because that tool for providing feedback was clunky at best.  With the new upgrade, this tool has become a bit more robust and user-friendly.  

When creating a new Assignment in Moodle (using the Assignment tool) one of the options in the Feedback Types section is Annotate PDF. 

When this option is selected, the grading screen will open up the submitted PDF within the Moodle environment itself. The caveat here is that students MUST submit their assignment in PDF form for this option to work (otherwise all you will see as an instructor is a large blank white area on the grading screen).

If the student did not submit an assignment OR if the student submitted the assignment in a file type that is NOT a PDF, then the left hand portion of the screen will be blank.

If you wish to use the Annotate PDF option, you can require students to submit a particular file type by going to the Submission Types section and identifying the Accepted File Types.  You may need to instruct your students on how to create a PDF from their primary word processing tool.

When a student has submitted your assignment and you go into the grading window, this is how the screen will show:

You’ll see that some common PDF markup options are available at the top menu sections here including comments, highlighting, lines, shapes, and the ability to freedraw (write).  Unfortunately the strikethrough and strikethrough with comment options are not available on this type of PDF annotator.  

One nice thing about this feedback option is that you can use handwriting if you grade on a device with a touchscreen and stylus (such as a tablet device).  Opening Moodle through your tablet’s browser (not the Moodle app) will allow you to mark up the PDF with your stylus as if you were making on a paper copy (though it is often a smaller space to put your handwriting).  

I used my iPad and stylus to create the handwritten markings seen here.

In all, the PDF markups are still limited when compared to other PDF annotating programs, but the option does allow for grading and making up within the Moodle environment.  The utility of this feedback option may be a bit limited, but there may be cases where this is a useful tool for faculty.

New Technology in HJF Library

Most people who are on campus a lot have heard about the major renovations that were done on the third floor of the HJF library over this past summer.  This space was renovated to provide a space for active learning and within this space there are a number of screens that can be used for a number of purposes.  In this blog post I want to give just a brief overview of some of the capabilities of this new technology. For those who are interested in a more direct training, please come to one of the two training sessions that I’ll be holding next week Sept 12th and 13th from 3:45-5:00 up in the Third floor area of the Library.

The screen technology in this space is intended to allow for collaborative work to be done.  In essence, one can think of the screens as having three distinct ‘modes.’

  1. An electronic whiteboard for writing notes, drawing, or other activities where handwriting is useful.
  2. A touchscreen computer where a person standing at the screen can manipulate the screen.  This screen can also be annotated upon (write/draw/highlight).
  3. A screen to project another screen (computer/tablet/phone). These screens can project up to 4 different screens at a time.

I’d like to show just a few images of the technology and share some of the potentially useful features.

Electronic Whiteboard

The electronic whiteboard (called Note), allows for users to use a solid color background OR other images.  Some pre-loaded backgrounds include a lined notebook, music staff, grid paper, sports fields and some basic grids and flow charts.  In addition to these pre-loaded images, users can upload their own image or PDF files.

In terms of writing and sketching capabilities, this Note tool has a variety of pens, brushes and shapes to choose from.  Additional pages can be added and saving what has been created is as easy as scanning a QR code with your mobile device.  

The Whiteboard with a solid black background and some of the shapes that can be created.
Music Staff background (yes, bass clef is available as well).
Grid background
QR code to easily save this work onto your mobile device. This will save ALL pages that were created.

Touchscreen Computer

Mounted on the back of each of these screens is a Mac Mini computer.  When in this mode, the screen acts as a regular touchscreen computer. Any typical computer capabilities are possible including using web browsers, word processing tools, spreadsheet tools, and the like. 

The touch screen can be activated to be able to annotate (write on) the screen.  However, it is useful to know that the screen in this mode is really just a static image.  For example, if you were to use this to model providing written feedback on a paper, once annotated, you cannot scroll up to the next page.  This is a slight hindrance, but any annotations that are made can be saved and accessed again in the files on the Mac Mini computer. The mirroring software automatically adjusts the screen sizes for the device and the number of devices used.

Touchscreen Mac Mini projecting a Google Doc that I have turned on annotations. Basic pencil and highlighting annotations are available.

Projector Screen

When you are in the Mac Mini you can also use the screen to project another screen.  If you have a Mac then you will use your Apple TV tool to project. If you use Windows you will need to use Air Parrot.  Up to four different screens can be projected at the same time. However, the annotation feature possible in the Touchscreen mode is not available when projecting. 

Using the Mac Mini mode as a way to project my computer (right) and iPhone (left) at the same time.

Finally, all of these screens are equipped with video and audio so you can conduct web-conferences using these screens as well.  Some are positioned a bit more strategically for this use, but all have these capabilities.

Again if you want to learn more about how to toggle between these modes and get some hands on experience in using this new technology, please join me for the two training sessions happening Sept 12th and 13th.  

New Moodle Tips and Tricks: Or “How do I do what I used to do in Old Moodle.”

So most of us have at least looked at our Moodle since the upgrade this August. Most of the changes are in the appearance and layout of the site. Moodle has become a bit more ‘streamlined’ in its appearance and there have been changes in where different functions are located. In an effort to help us all make the transition to the new Moodle environment, I wanted to give the campus a list of a few things that can help you navigate around a bit easier.

How do I switch my role to student so that I can view my Moodle page as a student would?

It can be very helpful to see and/or demonstrate what a course Moodle page looks like from the student’s viewpoint. To do this the instructor will need to click on their name at the top right-hand side of the Moodle page and then select “switch role to” from the dropdown menu that appears.

How do I add blocks (like QuickMail) to my Moodle Course?

Moodle offers a number of different types of ‘blocks’ where different types of information or function can be added to courses. To find how to add these, you will need to first ensure that you have Turned Editing On (click the gear at top right hand of a Moodle course), and then you will find the “add block” function at the bottom of the left hand navigation of the site.

In addition to this menu function moving, there is another new feature to Moodle in that the screen is now responsive for the size of the screen the page is being viewed on. What this means is that if you keep your browser window small on your screen, the blocks may show up on the bottom of the course rather than on the right-hand side of the course. On a computer simply making your browser screen larger should make it so that the blocks will show on the right-hand side of the screen. On mobile devices, the blocks may only normally be visible at the bottom of the course. So if you or your students have a difficult time finding blocks, this may be the reason why.

Changes in Forums

One major change made in the forums to help with appearance and usability is that when posting to forums users are no longer necessarily directed to a ‘new page.’ However with this change it looks like some functionality has gone away (like posting immediately without delay or the ability to add attachments). These functions are still here (along with a new option for instructors to reply privately) but to access these the “advanced” link needs to be clicked.

Once selected then a new screen appears with many of the functions instructors used in the old Moodle including choosing whether that discussion post is subscribed to, sending posts immediately without delay, and adding attachments.

Another Forum tip in case folks want this, instructors can choose to make it default that they do not receive e-mails (notifications) of new discussion posts for their account (across all courses in Moodle). To do this, click your name in the top right hand corner and select preferences.

From here select Notification Preferences, scroll down to Forum and turn off the notifications here. This only affects YOUR account, not the students’ accounts.

Changes in Manual Grading for Quizzes

Many people use Moodle to give exams and quizzes in their courses. If there are items that are text-based (essays, short answers) there is a way to see all student responses on the same screen to make manual grading less click intensive. To get to this function has changed a bit. First, click on the quiz that you plan to grade and then click the gear on this page. DO NOT CLICK THE ATTEMPTS! You cannot access the Manual Grading feature from here.

Related to the Quiz activity, where you go to import question banks has moved as well. This change will be discussed soon.

Changes in Assignments

There have been a few changes in the Assignments activity, but the one that I want to focus on for this post is to highlight a change to how files are downloaded if an instructor uses the “Download All” function. The Download All function is very handy because it can same time, can automatically name files with the student’s name, and make conducting a bulk upload of feedback files possible (must have the file named in a special way).

When you do into view submissions, at the bottom of your student list you will see an Options section with three boxes checked. If you leave the “Download submissions in folders” checked then every single student submission will be in its own folder and the file will be whatever the student named it.

If you want to download all of the submissions in the old way (all into one zipped folder with files automatically renamed with names and the ability to use these files to do a bulk upload) then you will need to uncheck this box.

Unfortunately, at this time, there is not an administrative option to make this box a default ‘no’ so it is up to individual instructors to uncheck this box if you want to use the Download All function like in the previous version of Moodle.

Changes in Accessing other Administrative Functions

With the old Administration block removed, much of the functions that were present in that block are now in the gear on the top right hand side of a Moodle course. Functions such as accessing the Gradebook Setup, Backup/restore, and Import are clearly visible.

Hidden within the “More” link are other functions such as: Reports, Importing Question Banks, Creating Groups, and Adding Enrollment Methods (course meta-links).

Hopefully this post can serve as a quick reference as we are all getting familiar with the new Moodle organization. These tips were selected because these are ones that were asked of me the past several days. This is by no means an exhaustive list of all of the changes. As this semester goes on, I hope to give several other posts about new features and changes to help our campus community adjust to the new Moodle interface. As always if you have questions or want me to help walk you through anything contact me for assistance.

Active Learning Tool: Student Response Systems

This week I want to focus on a tool that many of us are probably familiar with and have likely used: Student Response Systems (AKA Clickers).  Over the past 10 years, student response systems have evolved in many ways. The earliest systems (TurningPoint, iClicker) required users to purchase software and hardware systems in order to use these tools.  A PowerPoint ‘plugin’ needed to be purchased and installed on the instructor’s computer. A receiver needed to be plugged into the system where the questions were being displayed, and students often were required to purchase their own stand-alone clicker or schools purchased clicker sets that needed to be hauled back and forth.


These early systems were expensive and cumbersome, but many who used them enjoyed the type of instant feedback that could be gathered.  Today, these systems can be at very low cost (free) and much less cumbersome. Most systems today rely on the students using their own smartphones and Internet-based programs to relay information back and forth.  Early systems tended to be restricted to forced choice (multiple choice, Likert scales, True/False), whereas today’s systems can include things like student-created drawings, open ended responses, and even short answer or essay types of responses.


There are a number of different tools that act as a student response system, and I’ll provide a list of a few that I’ve used in the past at the end of this blog post, but the central feature of all of these are to create some student interaction during a class period.  Rather than focus on the specific tools (they can all do about the same thing), I’d like to focus on the different ways you might choose to incorporate a response system into your class.


The first is as a type of formative assessment for checking understanding.  This is probably the most common use for these systems. As you build your class-time presentation (power points or whatever), you can build in concept checks for students to respond to.  Basically this replaces the instructor calling out a question and waiting for hands to go up. This is very powerful to do because now an instructor can quickly gauge whether or not the class understood the material just presented and can adjust instruction as needed.  One thing to keep in mind that though this seems easy on the surface, the task of coming up with the right questions to ask can be more work than anticipated. I tend to try to ask questions on commonly misunderstood concepts or to provide students the opportunity to try to apply the concept to a real-life example or problem.


A second method for using these systems is by using them as discussion starters.  If you are about to have a discussion on some controversial topic or topic of common disagreement, you can do a quick poll of the class to see where opinions lie before the discussion begins.  This allows the whole class to see the diversity of opinions and to recognize that they may not be the lone person in their particular belief. In the past I’ve used response systems to allow students to anonymously report their own experiences with a mental illness (such as depression, bipolar, anxiety, or eating disorder) prior to having small group discussions so that students are made aware that there are people in the class that are either living with these disorders or know people close to them who are.  This can assist in students being respectful of their comments as they have their discussions.


A final incorporation that you can use is yet another form of formative feedback.  Because more of these response systems allow for open ended answers, you can use these tools to conduct common end-of-class-period assessments such as the one-minute paper, muddiest point, or additional questions.  These are easily submitted and recorded for the instructor to read and respond to during the next class period.


Now as promised, here is a list of a few different student response systems that you can check out.

Moodle Assignment Feature: Grading options (rubrics, marking guides)

This third post in a series of Ed Tech Blog posts focusing on different options within the Moodle Assignment Activity focuses on different types of grading functions.  So far this semester, I’ve introduced the options of the Download All, Offline Grading Sheet, and the batch upload features of this tool to help grading be a bit less time consuming (less downloading/uploading time).  Today I describe two “Advanced” grading features available in the Assignment Activity: Rubrics and Marking Guides.


Many of us use rubrics when creating our grading schemes especially for larger papers and projects.  Rubrics like this are very helpful for both instructors and students because they more deliberately outline the expectations for student work.  Research does demonstrate that the simple act of providing (and describing) rubrics prior to students beginning work on their projects can help to increase student performance (cite).  Of course the students need to actually pay attention and use these rubrics as they build and revise these projects, but it does help facilitate communication of expectations.


You can build your rubrics right into Moodle assignments in two ways: Rubrics (which creates boxes that you select) and Marking Guides (allows for ranges of scores to be placed in each criteria).  Here is a visual example of each type of advanced grading:


Moodle Rubrics:


Each level of each criteria has a description of the expectations and a set point value.  Instructors designing the rubric can determine the point value for each level. Rubrics make for quick grading because graders then simply click the level achieved by the student.  However, there is no option to alter the point values for each ‘cell.’


GIF of a Moodle Rubric

Moodle Marking Guides:


Criteria are listed and described and a total point value is determined for each criteria.  Graders are able to type in feedback into textboxes for individual criteria and for overall comments.  Graders are able to select a point value range that is allowed by each criteria.


The benefits of building in these types of grading structures within Moodle include being a bit more efficient with grading and scoring.  Moodle will automatically calculate the total score for you when you use these features. Rubrics are nice because graders can just click the cell they determine the student work to be at.  Additionally, you have the option of making these grading criteria for marking guides and rubrics visible to students within the assignment activity itself, so students are aware of how they will be evaluated.  Additionally, when students receive a grade they see the same rubric or marking guide and can see why they have missed points or done well.


Some weaknesses of using these grading structures include not being able to use the Offline Grading Sheet to batch upload grades.  You can still to a batch upload of feedback files, but because of the need to enter in the individual rubric criteria, the offline grading sheet is not possible.  Another weakness specifically with the Rubric option is that the points allocated to each cell cannot be altered when grading. What I mean by this is that clicking a rubric cell is an all-or-none action.  Keeping this in mind when building the rubric is important. In my own use, I have found that I sometimes ended up giving much higher or lower scores than I believed was really warranted because I was tied to the points on the rubric and these did not allow me to give more nuanced grades.  I personally tend to find the Marking Guide a nice compromise to this issue because I am able to give a range of points within a grading criteria.


Building these can be a bit time consuming and I would recommend including these in your courses after you have built up most of the rest of your course first.  You can always grade using the simple grading method. It is also possible to create rubrics that you use for multiple assignments (for example, the same rubric is used for all drafts of a paper or is used for all of a particular type of assignment).  Below is a series of videos on how to create Rubrics and Marking Guides in Moodle.

Creating a Rubric in Moodle    [Scroll down to see how to Create a Marking Guide]

Creating a Marking Guide in Moodle

Alternate ways of presenting content: Softchalk and VidGrid Interactive Video Features

Content creation is something that we as instructors and faculty engage in often.  This is commonly seen as creating our lectures or PowerPoints for our classes or creating activities and worksheets for our students to complete.  There are many ways that we can choose to present content: print textbooks, electronic textbooks, interactive ebooks, online lessons, webpages, pages within learning management systems, videos, and audio (podcasts).  In this blog I want to discuss two tools available to faculty at Morningside that can allow you to create interactive content for your courses: SoftChalk lesson builder and VidGrid interactive videos.


SoftChalk


Many of you have likely heard the name SoftChalk, many of you may not have.  SoftChalk at its core is a content delivery system. It is an online tool for creating and delivering content to students in ‘lesson’ form.  Here is a quick example of a SoftChalk lesson that I have built.


Learning to use SoftChalk is relatively easy, but because of the many different features for displaying and embedding content and for creating interactive opportunities one can easily be overwhelmed by the sheer options there are for creators.  How is SoftChalk different from Moodle? First SoftChalk is really intended to be a part of a Moodle course and not to replace a full Moodle course. Second, the interface (feel) of a SoftChalk lesson is a bit more linear than Moodle might be. Third, SoftChalk allows for different forms of activity and content interaction than Moodle can provide.


Let me break these down just a bit: First SoftChalk is NOT a Moodle substitute. Though it seems that SoftChalk has many of the same features as Moodle, it would be unwieldy to create one SoftChalk lesson to replace a full Moodle course.  SoftChalk does have a ‘Score Center’ where performance on the activities can be recorded, but it is not the same as the Gradebook feature in Moodle. SoftChalk is intended to present specific content and related activities WITHIN the LMS environment.


Second: SoftChalk is more ‘linear’ than Moodle.  When working through a section in Moodle, it is not uncommon for a student to need to click back and forth to go from content to content (file by file) and content to activity (content to assignment).  Within SoftChalk learners are presented with a series of pages that they progress through. Each page can include multiple pieces of content and activities.


Here is an example of a SoftChalk Lesson


Third: SoftChalk has different types of activities.  SoftChalk does have activities similar to Moodle such as quizzes, but what it does not have is the ‘dropbox’ (i.e. assignment) tool of Moodle.  However, SoftChalk does have some interactive activities that are different such as sorting activities, crossword puzzles, different types of drag-and-drop, labeling activities, interactive tabbed call-out boxes and the like.  Mostly intended to provide practice and formative feedback, SoftChalk allows for the learner to interact with the content in a variety of ways.


Here are some examples of different types of SoftChalk Activities


VidGrid Interactive Video Features


You are likely aware that Morningside has a video creation, storage, and editing tool called VidGrid (formerly Ilos).  For those who are interested in creating video content, VidGrid offers a number of interactive features for their videos.


First VidGrid allows for questions to be embedded within their videos.  These questions pop up while the video pauses and the student is then expected to answer the question.  These questions (if multiple choice) are automatically scored and the student received immediate feedback.  There is also the option of linking this to Moodle so that the student’s score on a set of video questions is recorded in the Moodle Gradebook.  There is also the option for a “Call to Action” question. This feature asks students to usually click on a link to another website and to complete some action that is being asked in the video.  This is a way of making it simpler for students to navigate between content pieces (your video and whatever website they are expected to go to). If you are interested in what these two features look like for students, here is an example:

Video with Interactive Questions


If you are interested in HOW to do these things within VidGrid, here is a video demonstrating how to accomplish this:

How to make Videos with Interactive Features in VidGrid


If you want to learn more about how to use these tools or whether these might be the best tools for what you want to accomplish, please feel free to contact me for a consultation. On Tuesday Nov 5 at 3:45 I will be hosting a development session for NEW USERS to SoftChalk.  A SoftChalk 2.0 session will be held later this year.


QM Specific Standard 6 – Aligning outcomes with technology tools

This week Susie and I will be facilitating a faculty development workshop on the topic of alignment.  Alignment in instructional design terms is the connection between the course assessments, activities, materials, and outcomes.  Designing a well-aligned course helps ensure that what we expect students to do/accomplish is actually what we are asking them to do/accomplish.


The Quality Matters rubrics have a large alignment component present.  There are six specific standards that evaluate the alignment within an online/blended course.  Each of these standards are considered Essential (3 point) standards which means if they are not met, then the course cannot meet Quality Matters expectations.  Standard 6 in the Quality Matters rubric focuses on the course technology and includes an alignment standard (6.1).


Quality Matters Standard 6.1 states “The tools  used in the course support the learning objectives or competencies” and basically evaluates whether the technology tools within the course help students to meet the course and module outcomes appropriately.  For example, the use of a discussion board to simply address an outcome that focuses on a student ‘Identifying’ information is probably not the best alignment. Discussion boards are best used to help students “discuss,” “evaluate,” “debate,” or “argue” topics.  An instructor who uses a discussion board simply as a way for students to identify information is not utilizing the technology to its benefit and frankly these “discussion” are probably pretty boring!


The opposite can also be true.  If an instructor is using a self-scoring quiz to evaluate students on highly complex cognitive skills such as “creating,” “prioritizing,” or even “analyzing” is likely not using the best technology.  The task in choosing a technology tool is to choose the best tool for the job. Sure you could use a hammer to install a screw, but it’s not the best tool for the job.


In addition to finding the best tools to accomplish the outcomes of the course, Standard 6.1 also states that students should be informed in some way why the technology is being used.  Making clear to students why the instructional choice of a discussion board can help students to understand why student-to-student interaction is the best way to address a particular course outcome.  Explaining why you are asking students to utilize a social media site will help students best use that tool for their learning.


Any technology that is used in the course should be used in an attempt to vary the learning activities and assist the learner to engage in active learning.  Online courses cannot simply be a text-only repository of information for the student to passively absorb. Technology allows for active engagement with information and with others to help facilitate learning.  QM Standards 6.2 and 6.3 focus on evidence for this type of active learning and variety in technology tool use. This is not to say that you should use a dozen different technologies, but rather enough variety so that students have a number of different ways that they can interact with the material.


Finally QM standard 6.4 focuses on student privacy and the use of technology.  There are a number of ways that programs can mine and use personal information.  To meet QM standard 6.4 the students must be provided with a list of the privacy policies of the technologies used in the course.  There also needs to be evidence for the protection of student privacy and data within the course as well. For example, if using social media, the utilization of a closed group helps to protect student privacy.  Allowing students to use a pseudonym on a public tool outside of the LMS is also a measure that you can allow to help student privacy. And though it is not a part of a QM evaluation, any time that you plan to use an external tool that requires students to create an account and provide even basic information, you should evaluate 1) the companies policy on the use of user data and 2) whether there is some reason to be suspicious of how the program might use user information.


The gist of Standard 6 is to evaluate the course designers/instructor’s use of technology tools for the purpose of achieving the course outcomes.  Technology tools should not be used for their own sake and when a technology decision is made for the course, it is helpful to let students know why that choice will help them to achieve the course goals.  It can be very easy to go overboard and try a number of different tools (I know I’ve been guilty of this). It can also be easy to simply use the tools that are common. Finding the right balance will help students to be exposed to the course content in different ways and use the right tools for the right job.

Active Learning Strategy – Digital Storytelling

A few weeks back I wrote a post about using Padlet in the classroom to help facilitate active learning.  Susie also facilitated another workshop on ways to incorporate active learning into your classrooms that gave a number of different strategies and tools both high and low tech.  This week I introduce another active learning strategy that incorporates some of the power of technology: Digital Storytelling. Digital storytelling is not a particular form of technology, but rather a strategy that uses the multimedia benefits of technology.  Digital storytelling requires learners to tell a story using digital means. These stories might be creative stories that students have created themselves, little autobiographies, documentaries, or even stories reflecting their progress on some large-scale project.


The art of storytelling requires the creator to understand the purpose of the story, organize important details, explain in clear language, and blend visual and verbal elements together in a meaningful and powerful way.  A good story often creates a mental image for the listener when crafted well. Multimedia allows for the creator of a digital story to present the visual image along with the verbal description. The cognitive skills needed to tell a good story are very complex and when a good story is told, there is evidence that the creator has deeply processed and understood their topic. What I tend to find most satisfying is when students can create an engaging and relatable story with the complex information that they have been learning in their classroom.  If these stories can be understood and appreciated by people not in higher-education, I think that is a significant gain. It’s a way for students to engage in ‘giving away’ their particular discipline to others and to demonstrate how their field is relevant to the general public in an engaging manner.


In a 2017 Inside Higher Ed Op Ed article, Kari Smalkoski, Linda Buturian, and Scott Spicer describe how they saw digital storytelling as a mechanism for transforming learning in a very powerful way including helping students to improve civic discourse and communicate multiple perspectives on an issue.  It does require instructors to break from the more familiar recipe of the traditional research paper, but allows for more student creativity and voice within the project. Here is a link to an initiative so-lead by Kari Smalkoski in the Twin Cities area in MN that presents a number of digital stories created by high school students on issues important to them (MN Youth Story Squad).


There are several resources available to those who might be interested in learning more about this strategy.


I could see this strategy being attractive to faculty who are interested in alternative ways of having students present in a class.  The technical skill needed to accomplish many of the tasks in digital storytelling can be made relatively easy through the variety of programs available, but time should be given and some structure provided to help students select tools and begin to use them to create products.  Having students collaborate on projects like this might be a unique way to present information. For those who are interested in cross-course collaborations, this might be one option for a project that students might collaborate with.