Category Archives: Moodle Basics

Moodle Assignment Feature: Grading options (rubrics, marking guides)

This third post in a series of Ed Tech Blog posts focusing on different options within the Moodle Assignment Activity focuses on different types of grading functions.  So far this semester, I’ve introduced the options of the Download All, Offline Grading Sheet, and the batch upload features of this tool to help grading be a bit less time consuming (less downloading/uploading time).  Today I describe two “Advanced” grading features available in the Assignment Activity: Rubrics and Marking Guides.


Many of us use rubrics when creating our grading schemes especially for larger papers and projects.  Rubrics like this are very helpful for both instructors and students because they more deliberately outline the expectations for student work.  Research does demonstrate that the simple act of providing (and describing) rubrics prior to students beginning work on their projects can help to increase student performance (cite).  Of course the students need to actually pay attention and use these rubrics as they build and revise these projects, but it does help facilitate communication of expectations.


You can build your rubrics right into Moodle assignments in two ways: Rubrics (which creates boxes that you select) and Marking Guides (allows for ranges of scores to be placed in each criteria).  Here is a visual example of each type of advanced grading:


Moodle Rubrics:


Each level of each criteria has a description of the expectations and a set point value.  Instructors designing the rubric can determine the point value for each level. Rubrics make for quick grading because graders then simply click the level achieved by the student.  However, there is no option to alter the point values for each ‘cell.’


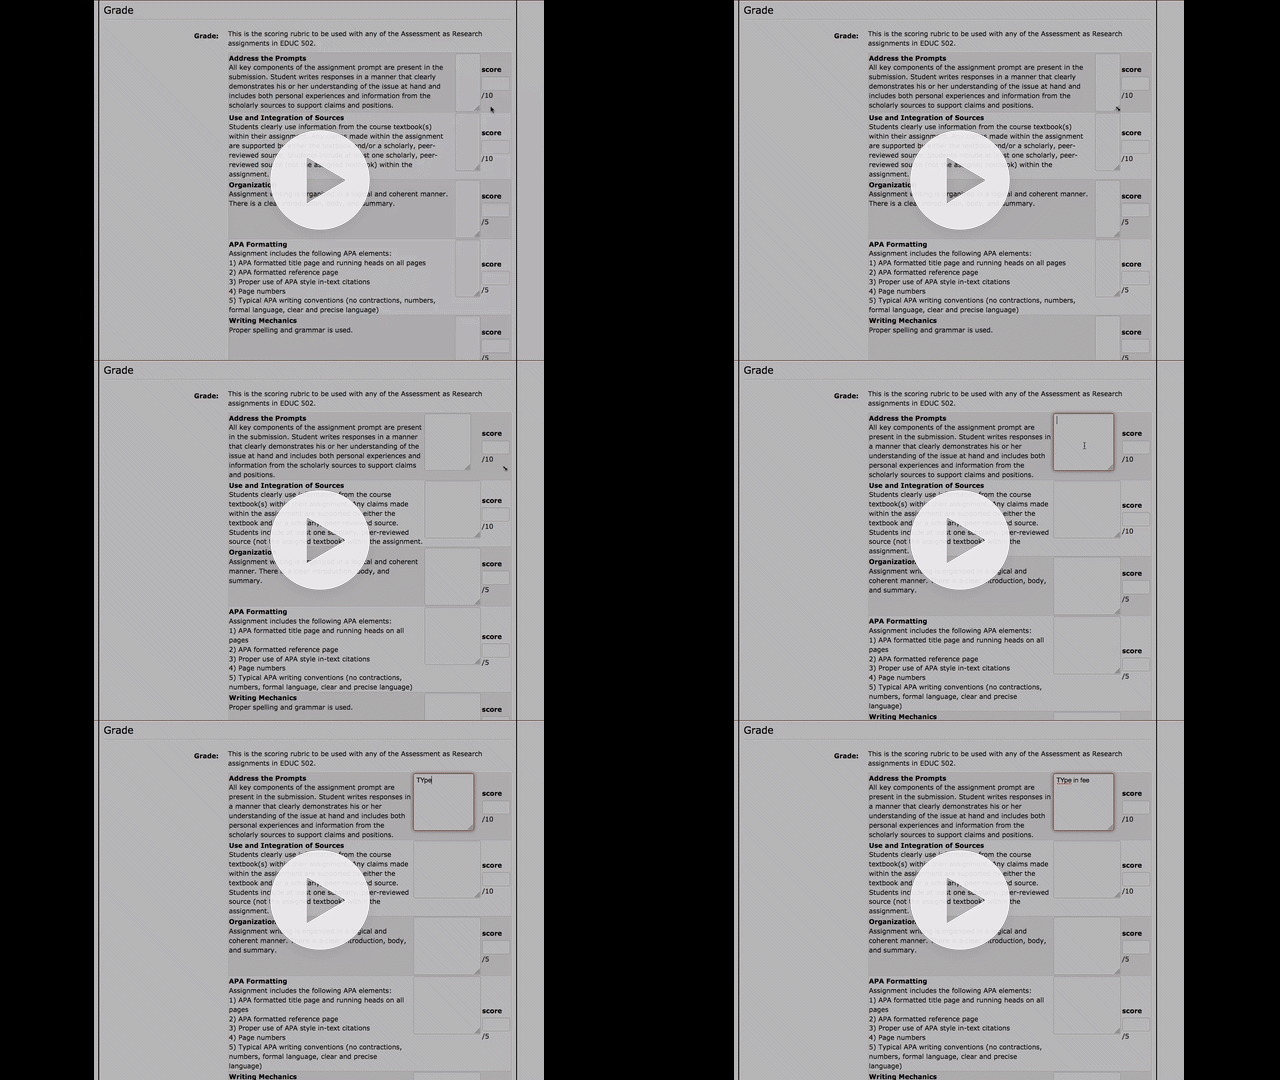
GIF of a Moodle Rubric

Moodle Marking Guides:


Criteria are listed and described and a total point value is determined for each criteria.  Graders are able to type in feedback into textboxes for individual criteria and for overall comments.  Graders are able to select a point value range that is allowed by each criteria.


The benefits of building in these types of grading structures within Moodle include being a bit more efficient with grading and scoring.  Moodle will automatically calculate the total score for you when you use these features. Rubrics are nice because graders can just click the cell they determine the student work to be at.  Additionally, you have the option of making these grading criteria for marking guides and rubrics visible to students within the assignment activity itself, so students are aware of how they will be evaluated.  Additionally, when students receive a grade they see the same rubric or marking guide and can see why they have missed points or done well.


Some weaknesses of using these grading structures include not being able to use the Offline Grading Sheet to batch upload grades.  You can still to a batch upload of feedback files, but because of the need to enter in the individual rubric criteria, the offline grading sheet is not possible.  Another weakness specifically with the Rubric option is that the points allocated to each cell cannot be altered when grading. What I mean by this is that clicking a rubric cell is an all-or-none action.  Keeping this in mind when building the rubric is important. In my own use, I have found that I sometimes ended up giving much higher or lower scores than I believed was really warranted because I was tied to the points on the rubric and these did not allow me to give more nuanced grades.  I personally tend to find the Marking Guide a nice compromise to this issue because I am able to give a range of points within a grading criteria.


Building these can be a bit time consuming and I would recommend including these in your courses after you have built up most of the rest of your course first.  You can always grade using the simple grading method. It is also possible to create rubrics that you use for multiple assignments (for example, the same rubric is used for all drafts of a paper or is used for all of a particular type of assignment).  Below is a series of videos on how to create Rubrics and Marking Guides in Moodle.
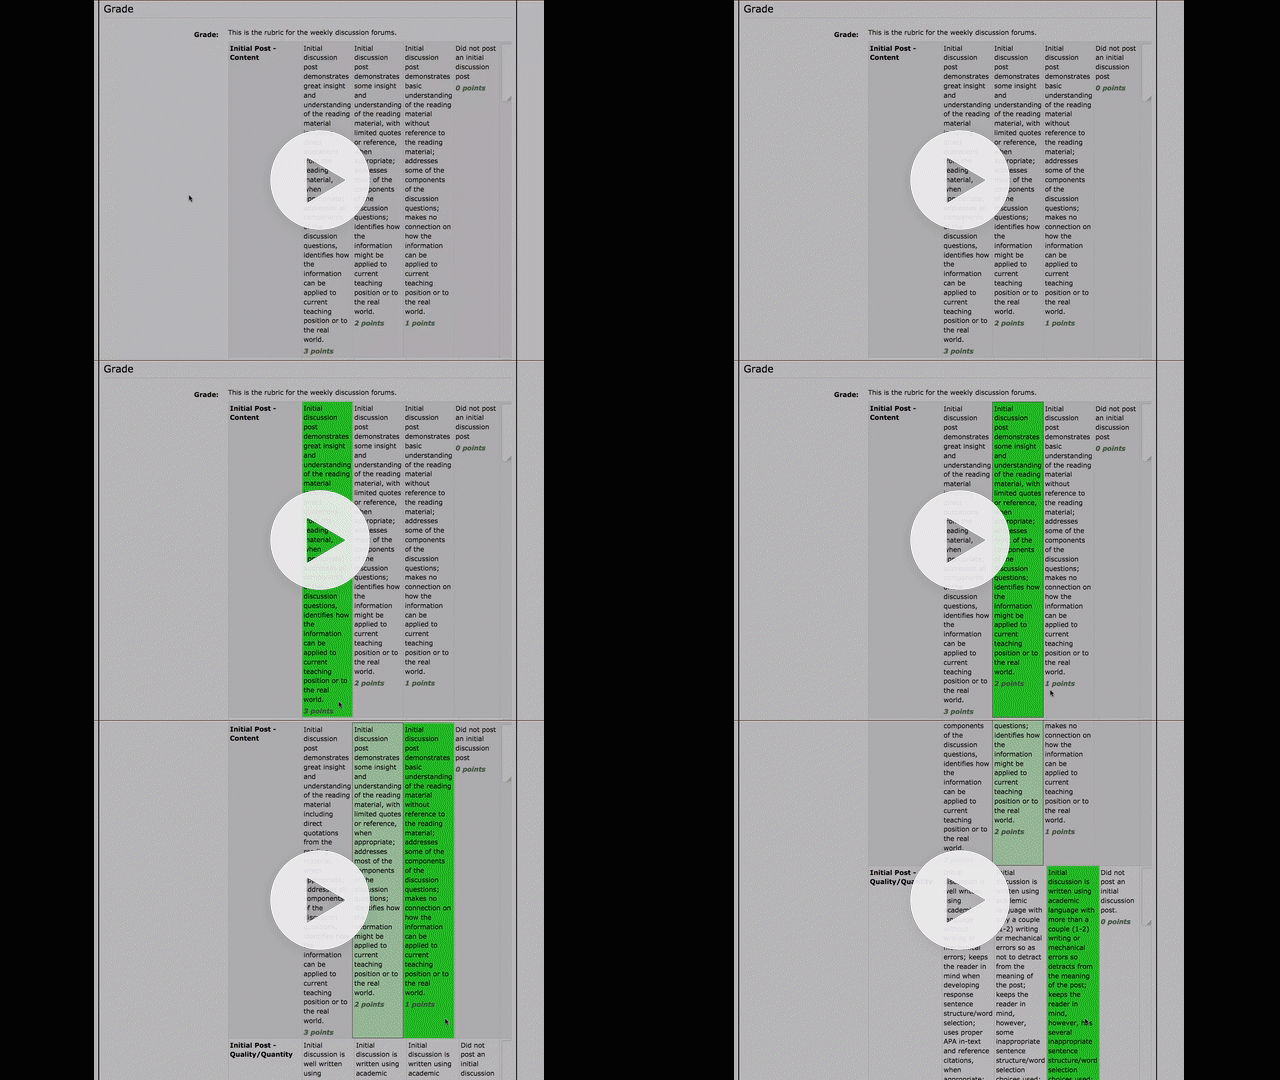
Creating a Rubric in Moodle    [Scroll down to see how to Create a Marking Guide]

Creating a Marking Guide in Moodle

Multiple Submissions/Drafts Moodle Tool

Did you know that Moodle offers a way for students to make multiple attempts on an assignment activity? One of the options within the Assignments settings allows instructors to better identify and organize multiple attempts on a single assignment.  There are a couple reasons why an instructor might choose to do this.  If you have an assignment where you allow students to resubmit until they hit a certain criteria, this option allows you to do this.  Another reason an instructor might use this feature is to organize multiple paper drafts.  In this week’s blog post I have linked a video that I made that steps instructors through allowing multiple attempts on an assignment.  The video is somewhat specific to how you might choose to handle multiple paper drafts, but this tool can be used in other ways as well.

The solution I offer here attempts to address the organizational mess that handling multiple paper drafts for multiple students can be.  Please see this 16 min video and if you are interested in incorporating this next semester, I am happy to help you get the assignment set up to do what you want.

https://youtu.be/eTdnb7-orB4

Importing Features of Moodle: Importing course materials and question banks

It may be a little early to be talking about getting ready for the next semester, but with registration day going on, it is certainly on the horizon.  A while back I posted a blog on how to create a new Moodle Course. In this post I will describe how to import content from an old course into a new course.

The import feature is a great time saver especially for those who use Moodle heavily in their courses.  It basically copies one of your old classes into a new class without bringing in the student data from previous courses.

Performing a course import

  1. Create the new class
    • From home page scroll down to see all courses. Then scroll down to add new class.
    • See the page in the Moodle Knowledgebase: Autoenroll on how to do this.
    • Be sure you use the EXACT title of the course from CampusWeb (including any punctuation – whether or not it makes sense)
  2. Go to the new class page
    • Will first see a screen to enroll (I think, unless that is special to my Moodle Admin role). You can probably ignore this (students will auto enroll) but be sure you are enrolled as a Teacher. Otherwise continue to add content.
  3. Begin Course Import
    • Administration –> Import
    • Select the old course you want to copy from the list
    • Select what you want to import over
      • May choose to not import things like calendar events (i.e. assignment and quiz dates) and groups – things specific to that old semester.
    • Select the specific materials you want to copy over.
    • Perform Import (takes a few seconds depending on how many materials you have)
  4. Clean up the new class (this can be a little time consuming but better than doing everything over again)
    • Change the due dates on all assignments and quizzes (edit resource then expand all to change dates)
    • Change references to specific dates in any text (labels, assignment descriptions)
    • Upload new documents (new syllabus, updated assignments, etc.)

Using this process the most time consuming element is cleaning up the new course to reflect the new dates. There is not a feature that will automatically adjust the dates for you, unfortunately, but this is still much quicker than re-creating the entire course.


Another importing feature that Moodle has is a question bank import.  Using this feature you can import existing question banks (from publishers or self created) into your course and makes for quick work at getting existing questions into Moodle for quizzes and tests.

Performing a Question Bank Import

  1. Go to the course you want to import the question bank to
  2. Go to Administration –> Question Bank –> Import
  3. Select the type of question bank to import and proceed through the steps.
    • Moodle question banks support most major question bank file types (including Blackboard, WebCT, and of course Moodle)
  4. If you want to create your own multiple questions you can create your own question bank using Aiken format.
    • Uses a plain text file type (.txt)
      1. Use Notepad on Windows Machine
      2. Use TextEdit on Macs
      3. If go through Word save as a .txt file to start and choose UTF-8 formatting. If auto-formatting begins, turn this off to ensure correct formatting for the importing function.
      4. Use this format when writing the questions
    • This process allows for quicker writing of MC questions.  All questions can be written on a single document rather than doing all the scrolling and clicking necessary to create the same questions within Moodle itself.
    • It is probably still best to create short answer, essay, and matching questions within the Moodle Quiz activity.

You can also export question banks created in Moodle using the Administration –>Question Banks –> Export function.  This allows you to share your question bank with others or to save it locally onto your computer.


New Moodle Look Coming

With the recent upgrades to Moodle will be coming a new look as well.  Previously, Morningside used a default theme called “Formal White.” We have learned that this theme does not play well with the new upgrade to Moodle.   Because of this we will be changing the default theme to “More.” This will result in your Moodle pages looking a bit different and possibly some of your blocks shifting position. We have decided to do this because there are a few important benefits that come with this change.

One benefit is in the grade book. With “More” the student names on the grade book do not scroll off the screen when scrolling right to left, similar to locking a column in excel or google sheet. Additionally, there have been issues with students not able to post to forums with the old Formal White theme.  This is resolved by changing the theme to “More.”

Sometime today (Monday, Sept 14) this change will happen so please be aware of this. If you do not use the default theme, your page should stay as is. This should only affect those that keep their Moodle pages on the default theme.

If you would like to try to play around and change your page theme, you can do so by going into the “edit settings” for the main page of your class and scrolling down to “appearance.” Here you can select a theme in the “Force Theme” menu. Obviously from the content of this post, some theme are better than others.  The folks at eclass4learning suggest either “More” (our new default theme) or “Clean.”

Here is a link to a PDF put together by Sherry Swan describing how theses themes compare on the computer and on a mobile device. Moodle Theme Comparison 20150910

Sherry describes the differences like this:

I have attached some screenshots of my Moodle sandbox course showing the Formal White (FW) theme, which is our current default, the Clean (C) theme, and the More (M) theme.
Page 1 shows PC screenshots of the three themes: FW, C, & M
Page 2 shows M with blocks either docked or moved to left side
Page 3 shows Android phone screenshots of FW and M
From the user’s perspective, when viewed on a PC, the differences are:
  • FW has darker shading around header and blocks, C and M have light shading that may not even be visible, depending on the clarity of one’s screen (you will notice that the shading is so light that my screenshots did not pick it up)
  • Color scheme differences in block text and descriptive labels, FW all block and descriptive text in black, C black and blue text, M black and orange text
  • Left and/or right blocks take up more space horizontally in C and M, so it is suggested that blocks be docked or placed all on one side or the other to leave more room for the main content area

From the user’s perspective, when viewed on an Android phone:

  • FW appears much the same as on PC, but much smaller
  • Color scheme differences as noted above
  • C and M show the main content area (the middle portion of FW view) first and then non-docked blocks appear at the bottom

My thanks to both Sherry Swan and Shaun Meyer for helping with this transition and providing the information included in this blog post.


It’s August…where did the summer go? Setting up Moodle Courses.

Well, July has passed into August. Where has the summer gone! If you are like many faculty, this turn of the calendar signals the time to begin prepping for Fall semester courses. Getting syllabi written, course schedules set, assignments decided upon, and areas to focus on for improvement are just a few of the items that begin to fill out time during this month. Another is getting our Moodle courses ready for the fall. This blog entry will focus on some of the nuts-and-bolts of getting your course up and running and ready for the Fall courses when they begin. I’ll cover the following topics 1) setting up the course itself so that students are auto-enrolled, 2) options for organizing the Moodle page for your course, and 3) things to think about in terms of how you plan to use Moodle in your course.


Setting up your Moodle Pages


To set up a new Moodle page is a relatively simple activity, but there are certain things that must be done so that Moodle talks to Aims and allows your students to auto-enroll in the Moodle course. To set up a new Moodle page follow these steps:

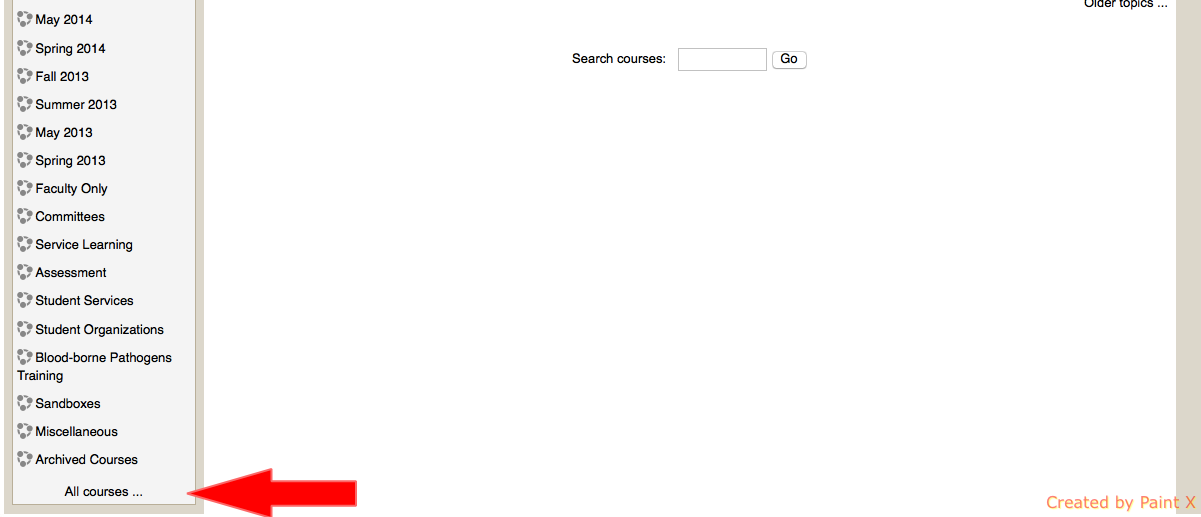
  1. On your home screen scroll down to the bottom and on the left hand block you will see a link that says “all courses.” Click this linkScreen Shot 2015-08-06 at 2.50.05 PM
  2. Scroll down to the bottom of this page and click “Add a New Course”
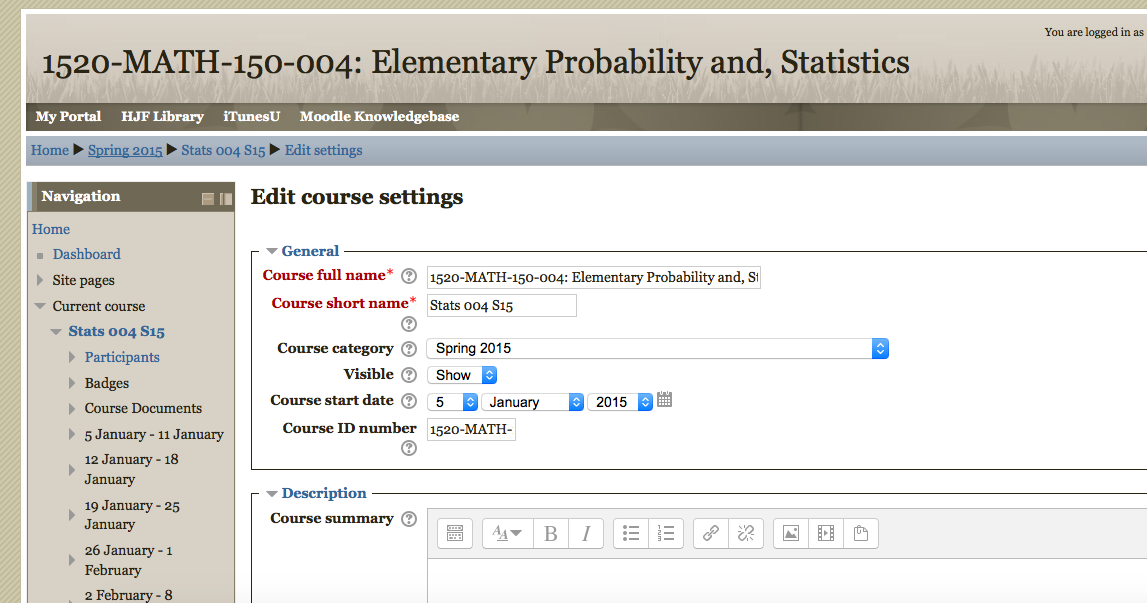
  3. In this next screen you will need to enter in some specific information from Campus Web. This will allow your Moodle course to auto-enroll your students into the course.
    1. The course full name needs to include the code for the term, the prefix, course number, course section, and course name EXACTLY as shown in CampusWeb
    2. Then in the Course ID copy the Term, Prefix, and Course number, and section once again.
    3. In the Course Short Name you can choose what you want to enter here.
    4. Choose the appropriate category for the term.
    5. In the Course Start Date I recommend starting the course on the Monday of the week that classes start so that the automatically generated dates go from Monday to Sunday.
    6. The rest of the options will likely work for you. The default organization is a weekly format, which seems to work well for most.
    7. Then click the Save Changes button on the bottomScreen Shot 2015-08-06 at 2.50.53 PM
  1. You now have your new course for the term created. You can now either 1) build the course from scratch or 2) import information from a previous term. If you want to import the information from a previous course (all files, assignments, question banks, quizzes, etc.) follow these steps:
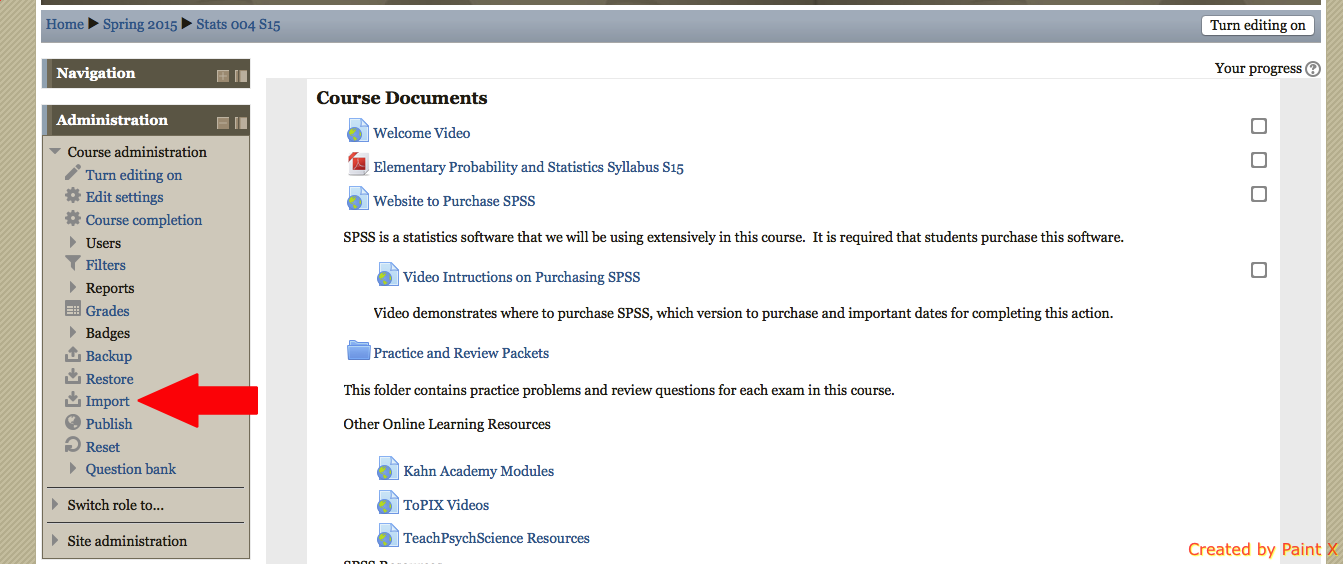
    1. From the course page scroll down to the Administration block and click ImportScreen Shot 2015-08-06 at 2.51.20 PM
    2. From here click the old version of the course that you want to use
    3. From here you will go through a series of screens where you can pick and choose what you do and do not want to have import over to the new course.
    4. Once you have chosen what you want to include in the new course there is a little clean up that will be needed, specifically in any assignments or quizzes. You will need to change the due dates to the new semester because the old due dates import over.


Choosing the Organization of your Moodle Page

When you first create your new Moodle page there is an option to choose the course format.

The most common (and default choice) is a weekly format. This will organize the Moodle page into the number of weeks that you want and includes the dates of each week. The weekly format works well if you use Moodle often to have students access resources and activities. Students can then simply go to the week in the semester and see what all is due.

Another commonly used option is the topics format. This organizes the Moodle page into topics rather than weeks and does not include the automatically generated dates. A topics format may work best for accelerated Summer courses or for courses where students can move as quickly as they wish through the class (competency-type courses such as some tutorials).

There are two other options (single activity and social format) that are less likely to be of use for general classroom so I will not focus on these options in this entry

When choosing the format to use I would recommend considering the following questions:

  • Can students move through the course at their own pace (or at least move as quickly as they wish)? If so you might consider the Topics format.
  • Is it important for students to see what is due for a particular week? If so you might consider the Weekly format.
  • Is your course divided into relatively distinct topics? A topics format may be of use to have the Moodle page align with the way your course is organized.
  • Are there long periods of time when you will not use Moodle? Then a topics format may be better so that you don’t have empty weeks.
  • Do you use Moodle a lot in your course? Then a weekly format may be best because there will be more ‘categories’ for you to place information and activities and these will be in order by date resulting in less searching on the part of the student for the information needed.


Considerations for How You will Use Moodle

When incorporating any form of technology (high or low tech) you should first consider what the utility of the tool is. This is the same with Moodle. You may feel pressure from students or other colleagues to use Moodle more, but your choice of how to use this tool should be first driven by the purpose for using this tool. Here are a few things that Moodle can do for you and your students:

  1. Provide a place to store documents used in the course in electronic format so that students have access to these at any time. This can include documents such as readings, syllabi, schedules, assignments, PowerPoint slides, etc. Basically this gives students who might miss class no excuse for not having materials that were passed out in class and provides students who were in class the ability to access materials if lost.
  2. Provide a place for students to electronically turn in assignments. This is good if the assignment is easily completed in digital format (many can be, some are more difficult). Faculty can then download, grade, and turn back work electronically. There are many different options for how to turn in work, some work better for some assignments. This allows students to turn in work even outside of class (so can turn in work if miss class) and reduces the printing and paper elements of assignments.
  3. Forums allow for students to have discussions with one another outside of class. There is an art to having forums work well which will be covered in another blog post to come in the near future. If you are interested in ways to help improve forum participation, please feel free to contact me for some of these tips or visit the Educational Technology webpage (currently in progress of being built) for a list of these tips.
  4. Create material for students to complete before class. If you are interested in ‘flipping’ your class, Moodle can be the means by which students access and complete the work to be done before the in-class work. Resources such as the Book feature or Page feature can be used to deliver text, video, or other forms of media.
  5. The Quiz feature has many options that allow for different forms of adaptive testing and quizzing. If you are interested in incorporating mastery learning or adaptive testing, feel free to contact me. This allows your exams to be more of a true learning experience rather than simply an evaluation of knowledge/skill. Tests can be the best form of learning if administered in the right way.


Summary of things that Moodle may help with:

  1. Students not having ready access to the course materials.
  2. Reclaiming lost class time turning back assignments.
  3. Encouraging/requiring work outside of class.
  4. Having students discuss ideas/concepts outside of class
  5. Test grading and handwriting issues.
  6. Flipping the classroom.
  7. Electronic assignment submission organization.
  8. Providing guided lessons to be completed on their own.
  9. Adaptive testing options.
  10. Maintaining a grade book that students can see at any time.
  11. Reclaiming lost class time due to conference travel or other reasons for canceling face-to-face class time.