Author Archives: christopherson

About christopherson

I am a junior faculty member at a small private college in Iowa. This blog is my sometimes consistent, but usually inconsistent postings of whatever might be on my mind (professionally, personally, or randomly).

Sway: Creating Visually Interesting and Interactive Projects

This week I want to introduce Microsoft Sway.  Sway is a program designed to help users create projects that are visually interesting and incorporates some interactive components.  It is a little difficult to describe what Sway is, so instead here is an example that I created.  This is a short project describing one of my hobbies, canning fresh foods.

Sway provides the user with a number of existing templates to choose from (for example I searched for ‘communication’ and Sway had a template ready for me with ideas of what to include) or to create their own. The basic building block is called a ‘card.’ These cards can be text or media based. Additionally there are different options for grouping cards together.  Another nice feature of Sway is the ease in finding media.  Sway holds a library of images and videos that are part of the Creative Commons License, so you can be confident that you are allowed to use the images you search for.  All of the images in my Sway example came from their library.  All I had to do was use a search terms (e.g. “tomatoes,” “chopping food,” “canning tools”) and a number of options were presented.

Bringing images in is done through a simple drag-and-drop action. In addition the user can include information about the image and include alt text (text that screen readers can read) for those who are visually impaired.

A few ways that instructors might choose to use Sway can include giving students a slightly different way of presenting material.  This tool allows for a story telling approach that PowerPoint may not do well.  Student may also use this tool to create electronic projects.  Stories, Informational Projects, Marketing materials, Research Presentations are just a few ideas.

If you are interested in seeing a Sway build in action take a look at this short 4 min video I made.

MyHistro: Interactive Timeline Builder

Ever wanted combine a series of historical events with images, video, description, and map locations? MyHistro is a free timeline builder that allows users to do this quite easily. Entire stories can be captured using this tool putting historical events into context in terms of both time and location.  There are a number of examples that can be viewed here.  To learn more about each event, click to read more and see more pictures and videos.

Creating a timeline is pretty easy.  First you need to set up a free account, but from there you can build your own stories (projects).  Here is an example that I created telling the story of all the places that I have lived. It took about a half hour to build this timeline.

Creating the timeline is pretty easy. All you do is identify the events you want to describe and provide the dates and descriptions.  Images can be uploaded (though I am having difficulty with this right now, it may be something to do with my OS upgrade to Sierra), but extended descriptions and videos from the web are easily added as well.

There is an ability to create collaborative projects as well so students can work together on a larger timeline project.

Overall this appears to be a nice, easy tool to help students engage with the material more both while learning from the timeline and in creating their own timelines. I’d be interested in hearing about different project ideas that faculty might have that this tool could make possible.

Introducing Lightboard

When creating content for digital delivery (i.e. the Interwebs), it sometimes seems as if we start to lose that important element of the instructor’s presence.  Creating a lecture using screen capture or PowerPoint narration just isn’t the same as being in from of your student so they can see you face, your hands, and hear your voice.  Of course you can just record yourself in front of a white board but then you are turning your back to the camera.  A solution? Something called a Lightboard.  This is a board that allows instructors to face their audience (the camera) and write at the same time.

Lightboards can be built in many ways, but essentially they all include the same parts.  A plexiglass board, a black background, lighting, a mirror, and a camera.  At Morningside we have created our own lightboard thanks to the persistence of Jessica Tinklenberg and the handiness of Jeremy Schneider.

Here is a quick demonstration of the lightboard that was shown in a faculty meeting recently:

Making lightboard videos is very simple, simply prepare your lecture, show up to the studio (currently on the second floor of the library), set the lights (about your height), and turn on the camera.  Any miss-steps, errors, time spent erasing, etc. can be easily edited out post-production.

For me I plan to use this extensively in the development of a potential hybrid stats class in the future.  In the past I used a program that recorded on a virtual whiteboard, but I want my videos for this class to be a bit more personal then my disembodied voice narrating a set of equations. Anyone who does create content using out lightboard we would love for you to share with the community so that we can see how you use it.  Please tweet your video to @MsideEdTech so that we can all see the cool stuff Morningsiders can make!

Morningside Ed Tech Webpage

For several months now I have been collecting many resources, tools, and ideas in an effort to provide these to faculty at Morningside College.  Now these resources are available on the new Educational Technology web page!

I’ve organized this site into three basic parts:

  1. General information about professional development opportunities, communications, and contact information.
  2. Research information on online and blended learning.
  3. Tools for different types of activities (communication, writing/notetaking, Moodle, Softchalk, open educational resources, etc.)

It is my hope that this will serve as an important place for faculty to find and explore different tools and strategies for incorporating educational technology into their classrooms.  If you know of other resources or tools that should be added, please contact me with this information.  As always, I am available for individual consultations and you can use the link at the bottom of my landing page to schedule a meeting with me.

Live Video from Around the World

One more blog post concerning using video in the classroom.  Were you aware that there are a number of live web-cams around the world that you can access? Live cams of Paris, Times Square, Elephants in India, the Omaha Hawk Cam, yes even Cavalier, ND (I know you all were curious about that city!).  A number of zoos and aquariums also have their webcams linked at this site.  You can possibly see a whale shark swim by on the Ocean Voyager WebCam. These and hundreds of others can be found at EarthCam.com. There are also several nature cams that can be found at explore.org.

What might be some potential uses of these  webcams? One possible use might be to see important events that happen to be occurring in real-time.  This could be one way to view the scene during important events. Another use can simply to expose students to what that particular location is like at a point in time.  Some webcams allow for time-lapse video and others still can be maneuvered to get a wider view. However not all of the EarthCams are live video.  Some are static images that can be manipulated.

An annoyance to be aware of is that many of these cams make you watch an ad before you actually get to the live view, but a little patience and you are soon onto taking a gander at Temple Bar in Dublin.

Finally remember the old saying, “what happens in Vegas, stays in Vegas?” Well this set of live webcams dispel that belief.


EDpuzzle: Embedding questions into video


Videos, so many videos!  As like my last post, the availability of video is a great asset for teaching and there are ways that we can manipulate video to be more useful for our students. Last time I discussed Vibby as a way to create shorter clips from video.  In this blog I introduce EDpuzzle a tool for embedding questions into video.

Why might instructors choose to embed questions into videos? There are probably two main reasons: 1) to check a students understanding and 2) to simply make sure they watched the video.  Edpuzzle provides a free and easy method for doing both.

EDpuzzle allows faculty to import any video (URL link, files), clip videos down, provide your own audio narration, and to embed questions.  If you create a class in EDpuzzle (students sign up for free and can self enroll into courses making the work on your end as simple as sending an e-mail with a link) you can view the progress of your students in terms of how much of the video they actually watched and how they performed on the questions.  Additionally, instructors can select options that make it impossible to skip forward in the video (so students actually have to let the video run.

Here is an example of an EDpuzzle video that you can try.

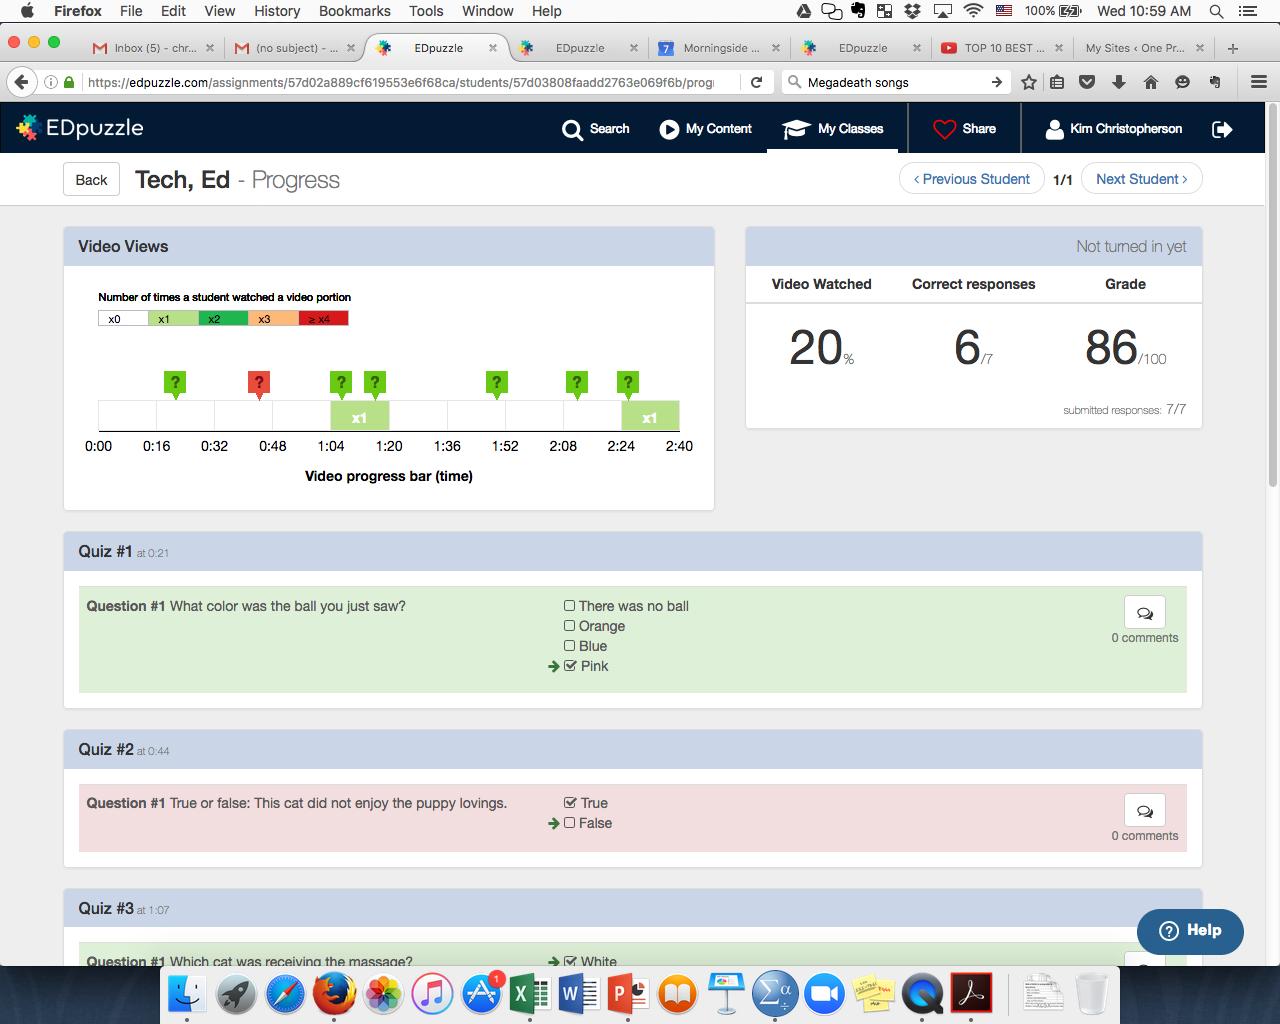
The instructor dashboard looks like this after a student has completed a video:

Screen Shot 2016-09-07 at 10.59.09 AMEDpuzzle can be integrated into Moodle by embedding it onto a page in Moodle or linking from Moodle.  However, there is not currently an integration with Moodle gradebook.  So if you want to have the EDpuzzle scores a part of your Moodle gradebook, this will need to be done manually.

EDpuzzle can help students engage more with the video and for instructors to track student progress. Best of all, it’s quite easy to use.

Make easy clips from longer videos – Vibby

Most instructors like to use video at some point or another in our courses.  Sometimes we watch the whole video, other times, we are only interested in one or two clips to highlight a point.  Sometimes there can be frustration with locating the right time, waiting for the video to buffer, and then trying to find the next clip.  Even when we plan ahead and get the video up, buffered ,and set to the right time, disaster can occur when we inadvertently close the window (ok disaster is an exaggeration, but this is frustrating, no?).

Additionally, if we would like to make these clips available to students, giving instructions on exactly where to start and stop the video can be cumbersome.  Vibby is a tool that allows users to create clips from longer videos and then you simply save your Vibby video.  No more searching for the right clips, losing the times that you wrote down just yesterday, or students frustrated with wondering if they watched the correct clip.

Vibby is a free service and is easy to use.  Vibby uses videos that are on the internet (you need to use a URL for the video). So if you are using a video that you created yourself, you will likley use your YouTube channel to house this. Next you highlight the selections of the video you wish to clip.  You can start and stop highlighting several times in the same video.  You can adjust the highlighting if you need to move where you started or stopped the clip. When you have selected your clips, you simply click save, select a category for your vib, and then you are given a URL and embed code to share your vib with others.  Once created, you can go back to edit your vib. This will bring up the original video so you can add/delete clips as needed.

The one weakness that I see right now is that for any vib you wish to create the clips can only come from one video.  You cannot create one vibby video from multiple videos on the Internet.  Additionally, the people that you do share the vib with do have the option of watching the full video, so if your intention of using Vibby is to remove violent or other questionable content so your students do not see it, this will not prevent them from being able to.

With this said, this can be just one way of easily creating and sharing video clips for your class.

How Ed Tech spent its summer vacation

Welcome back to another school year!  The students are back on campus, faculty are busy in their offices developing syllabi and planning their lessons. I hope everyone here had an enjoyable summer and a productive summer (however you define being productive). In this blog I wanted to share what has happened in Ed Tech this summer and to describe a bit my plans for the coming year.

This past summer was a busy one. I had several goals for the summer, most of which I met.  First, and perhaps the most significant was the creation of a formal training workshop for undergraduate faculty who will be teaching online courses.  In collaboration with Michelle Laughlin of the Center for Online Learning, we offered a 4 day training that blended both face-to-face and online components.  Using the Quality Matters rubric as a tool, these faculty began designing their online courses. This form of training will continue to be offered as more of our undergraduate faculty begin teaching online either in the summer or in the new Organizational Management program.

The second major accomplishment was the creation of a Moodle Bootcamp course.  I created this course as an Intro to Moodle.  It is a self-paced course that introduces you to the basic functions of Moodle including creating assignments and quizzes, creating resources such as files and folders, and how to set up a gradebook.  Participants who complete this course will receive a badge showing that they have completed this online training.  Any Morningside Moodle users has access to this Moodle Bootcamp, so if you are interested please check it out.

Another major goal of mine was to offer initial training on using the lesson building software SoftChalk Cloud.  In June those who were interested participated in a two-part webinar.  The ‘Getting Started with Softchalk’ webinar is 1-hour long and you can view the recording here. I do plan to offer some additional resources for those who are interested in learning more about this program.  Keep an eye out for emails from me announcing different webinars that are offered on different topics.  I may also make a few how-to videos myself to help fill in the gaps.  However, there are several video tutorials available from SoftChalk to get you started that are worth checking out.

Looking forward I have several goals for the upcoming school year.

  • Create a webpage for educational technology resources
  • Offer several faculty development workshops. Topics planned so far include
    • QM summer pilot panel
    • Using technology to discuss and engage
    • Developing student writing in online/blended courses
  • Explore the potential for a badging system for faculty professional development
  • Create a recognition system for faculty using technology in creative and innovative ways
  • Continue work on implementation of Quality Matters – attending QM conference in late October
  • Incorporate Ed Tech’s role in Academic Challenge initiative on campus

In addition to the bigger goals, I hope to increase my consultations with faculty and to continue to be proactive in discussing the role of ed tech with faculty and departments.  I look forward to working with all of you this upcoming year.  I welcome any feedback on the resources that I have created and ones that you feel are needed.  I hope everyone has an excellent school year!

VoiceThread: A different way to engage your students

This week I choose to describe a product called VoiceThread. It’s difficult to summarize exactly what VoiceThread is because it is a tool that can be used in many ways. Primarily it is a way to easily incorporate voice and video commenting onto digital media. But really the whole is different from the sum of its parts here in my opinion. Before I start to describe some ways that VoiceThread might be used, let me give you an example.  Visit this VoiceThread that I made. You can choose to comment as well by creating your own free account. You can provide new comments. But any direct relies to me (or to my dummy me) can only be seen by me with the free version. Threaded comments (i.e. direct replies to posts) are a feature of a paid subscription to the service.

https://voicethread.com/share/7689585/


So in the example you can see how I’ve presented some media (primarily a PP slide and some images) along with either a video or audio comment giving some information.  I also have a dummy student account that I used to post some comments so you can see how this feature is used.

What’s interesting to me is that I think that this product could be used in many different ways both in online courses and within traditional courses.  Here are a few possibilities:

  1. Narrate over your PP slides: VT imports PP slides one at a time so you can narrate over one slide. Then if you need to change something in the future you can change just one piece of the lecture rather than the whole thing.  I’d recommend making a MASTER copy of the lecture and then creating copies for each time a course is delivered.  Additionally as students are watching and listening to your slides, they can insert questions and comments which everyone can then see and reply back to.
  2. Conduct a video analysis: You can import video files and then narrate and manipulate the video (Like a play back when you watch sports). This could be useful for film students, analyzing speeches, or for coaches and athletes.
  3. Use as an alternative to a traditional text-based discussion forum: A prompt could be written on a PP side or other media could be presented to be the topic of discussion.  Users can then post their threads and rely to others. The whole discussion can then be played back and listened to.
  4. Engage in a debate: Similar to a discussion forum, have students have a debate back and forth replying to one another’s positions and assertions.
  5. Evaluate a visual image: Analyze a photograph, painting, etc. Use the markup features to highlight the elements being discussed.
  6. Receive feedback on a speech and visual aids: Have speech students create a first draft of their speech, record it through VT and then have peers provide feedback.

There is a free version of VT which is a public option. However, there are also subscription services to this product that provide some more privacy and integration within a schools LMS. Until we decide if Morningside might use VT extensively, I encourage you, if you are comfortable in doing so to play around with this product and see how you might use this in your course.

Get students creating with makerspaces

The notion of a Makerspace has arisen with the new orientation that libraries around the country have begun to take.  Libraries these days are much more than places to store and archive books, documents, maps, and other artifacts.  They have become places to create new things. Simply put, a makerspace is a literal space (typically housed in a library) that is stocked with materials which people can use to create things. This can include items such as simple electronics, 3D printers, laser cutters, sewing and craft supplies, and woodworking supplies. Makerspaces can also include computers installed with software  that would otherwise be expensive for an individual to purchase (e.g. photoshop, high quality video editing software) allowing the user to create new digital content.

Makerspaces have been around for about 5 years or so within the public and K-12 library systems.  But it is not until relatively recently that college and university libraries have begun to dedicate space in their libraries for a makerspace. A makerspace is much more than a cute place where people can come to be crafty or make a simple robot from a kit. It is a space that allows for learning to occur outside of the classroom. It allows students to see how what they are learning in the classroom can actually apply to so-called “real-life.”

Imagine the following uses:

  • A student begins to see how mathematics and physics apply to a building project.
  • An art student uses a 3D printer to create a new type of sculpture or model.
  • A history student uses the digital archives and the video creation and editing programs to create a virtual museum tour.
  • A literature student makes their own paper and binds a book.
  • Chemistry students use root beet kits to create their own soda.
  • Political science students use video and editing software to create their own campaign ads.
  • Theater students sewing costumes begin to see how geometry is used in the project they are completing.
  • Computer science students play around with photoshop to create attractive designs for the art used in their program.

There are probably many more possibilities. But the spirit of the makerspace is that it is an area where learning is put into an engaging and fun environment. The application is inherently integrative, as long as the connections between the disciplines/fields are made clear to the students.

In addition to these benefits, makerspaces also allow for more soft skills to be developed.  Having student work in groups, make plans, collaborate, experiment, and engage in inquiry are the real benefits to having spaces like this available.

Some may argue that your students already have access to some of these materials in their major, and this is true.  But the purpose behind a makerspace is to make the materials available to all. It can be an interesting experience to see how an art student might use a 3D printer or laser cutter. A computer science major may have a creative way of using photoshop that a photography student would never consider.

Finally, having a makerspace available can challenge faculty and students in what they might do in their coursework.  Might a final project in a literature class be something other than a lengthy analysis of a classic work? Could the student actually make something that would be appropriate for that course’s learning goals? Might a final project in a sociology course be the creation of an art project that illustrates the sociological concerns related to the course? With our new curriculum set to roll out next year, I would challenge our undergraduate faculty to consider new, unique, and innovative ways that a makerspace might enhance their courses. Our librarians are very interested in creating a space like this and would love the opportunity to engage in discussion on what a Morningside Makerspace might look like.

Here are a few more online resources on the topic of Makerspaces: